This guide will walk you through how to send usage into Maxio to bill your customers based on usage. When you're finished, you will have an API integration that automatically sends usage into Maxio.
Metered Billing Events-based Billing
Summary
- Feature
- Metered Usage (using metered components)
- You Need
- Developer experienced with APIs; a web app with Server-side code; the subscription_id is stored in your database
- Code
- Yes
- Difficulty
- ◉◉◉◎◎
Send usage with metered components
Sending usage to Maxio is one of the most important elements of your usage-based billing implementation. Metered components is useful for low-volume, basic usage-based line items.
1. How it works
DiagramHere is an example of the usage billing lifecycle for sending usage in real time and in batches.
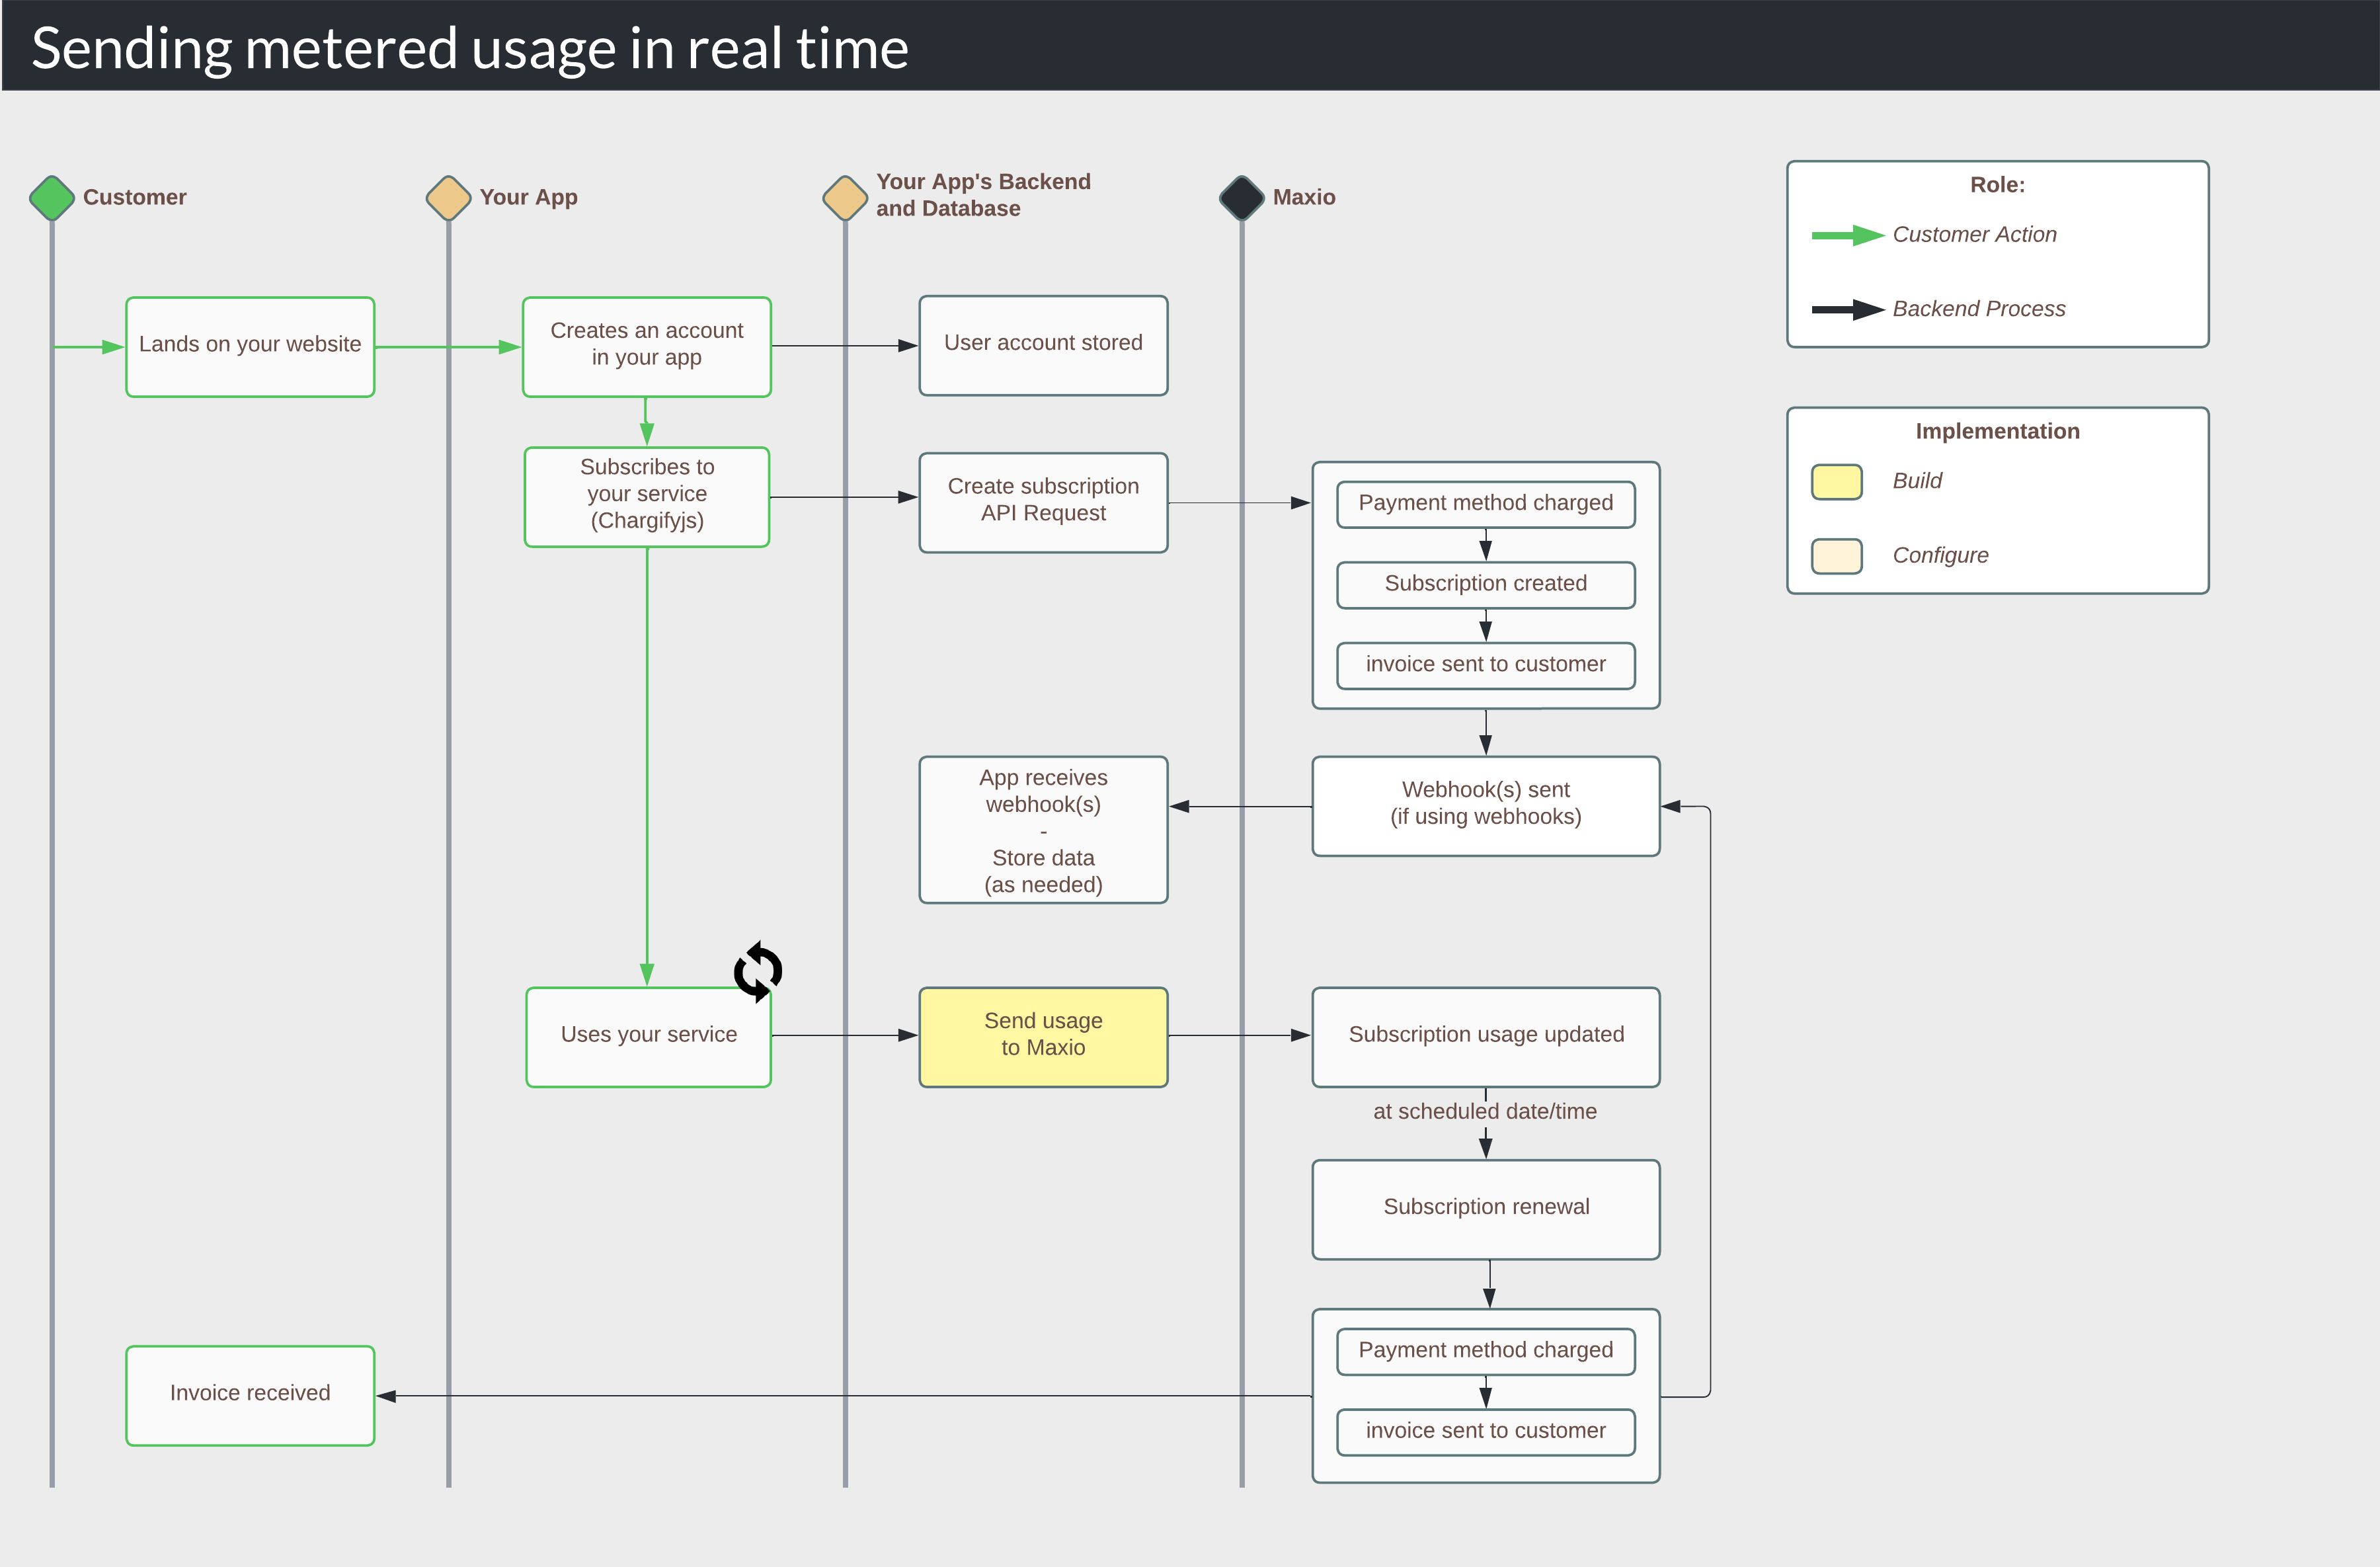
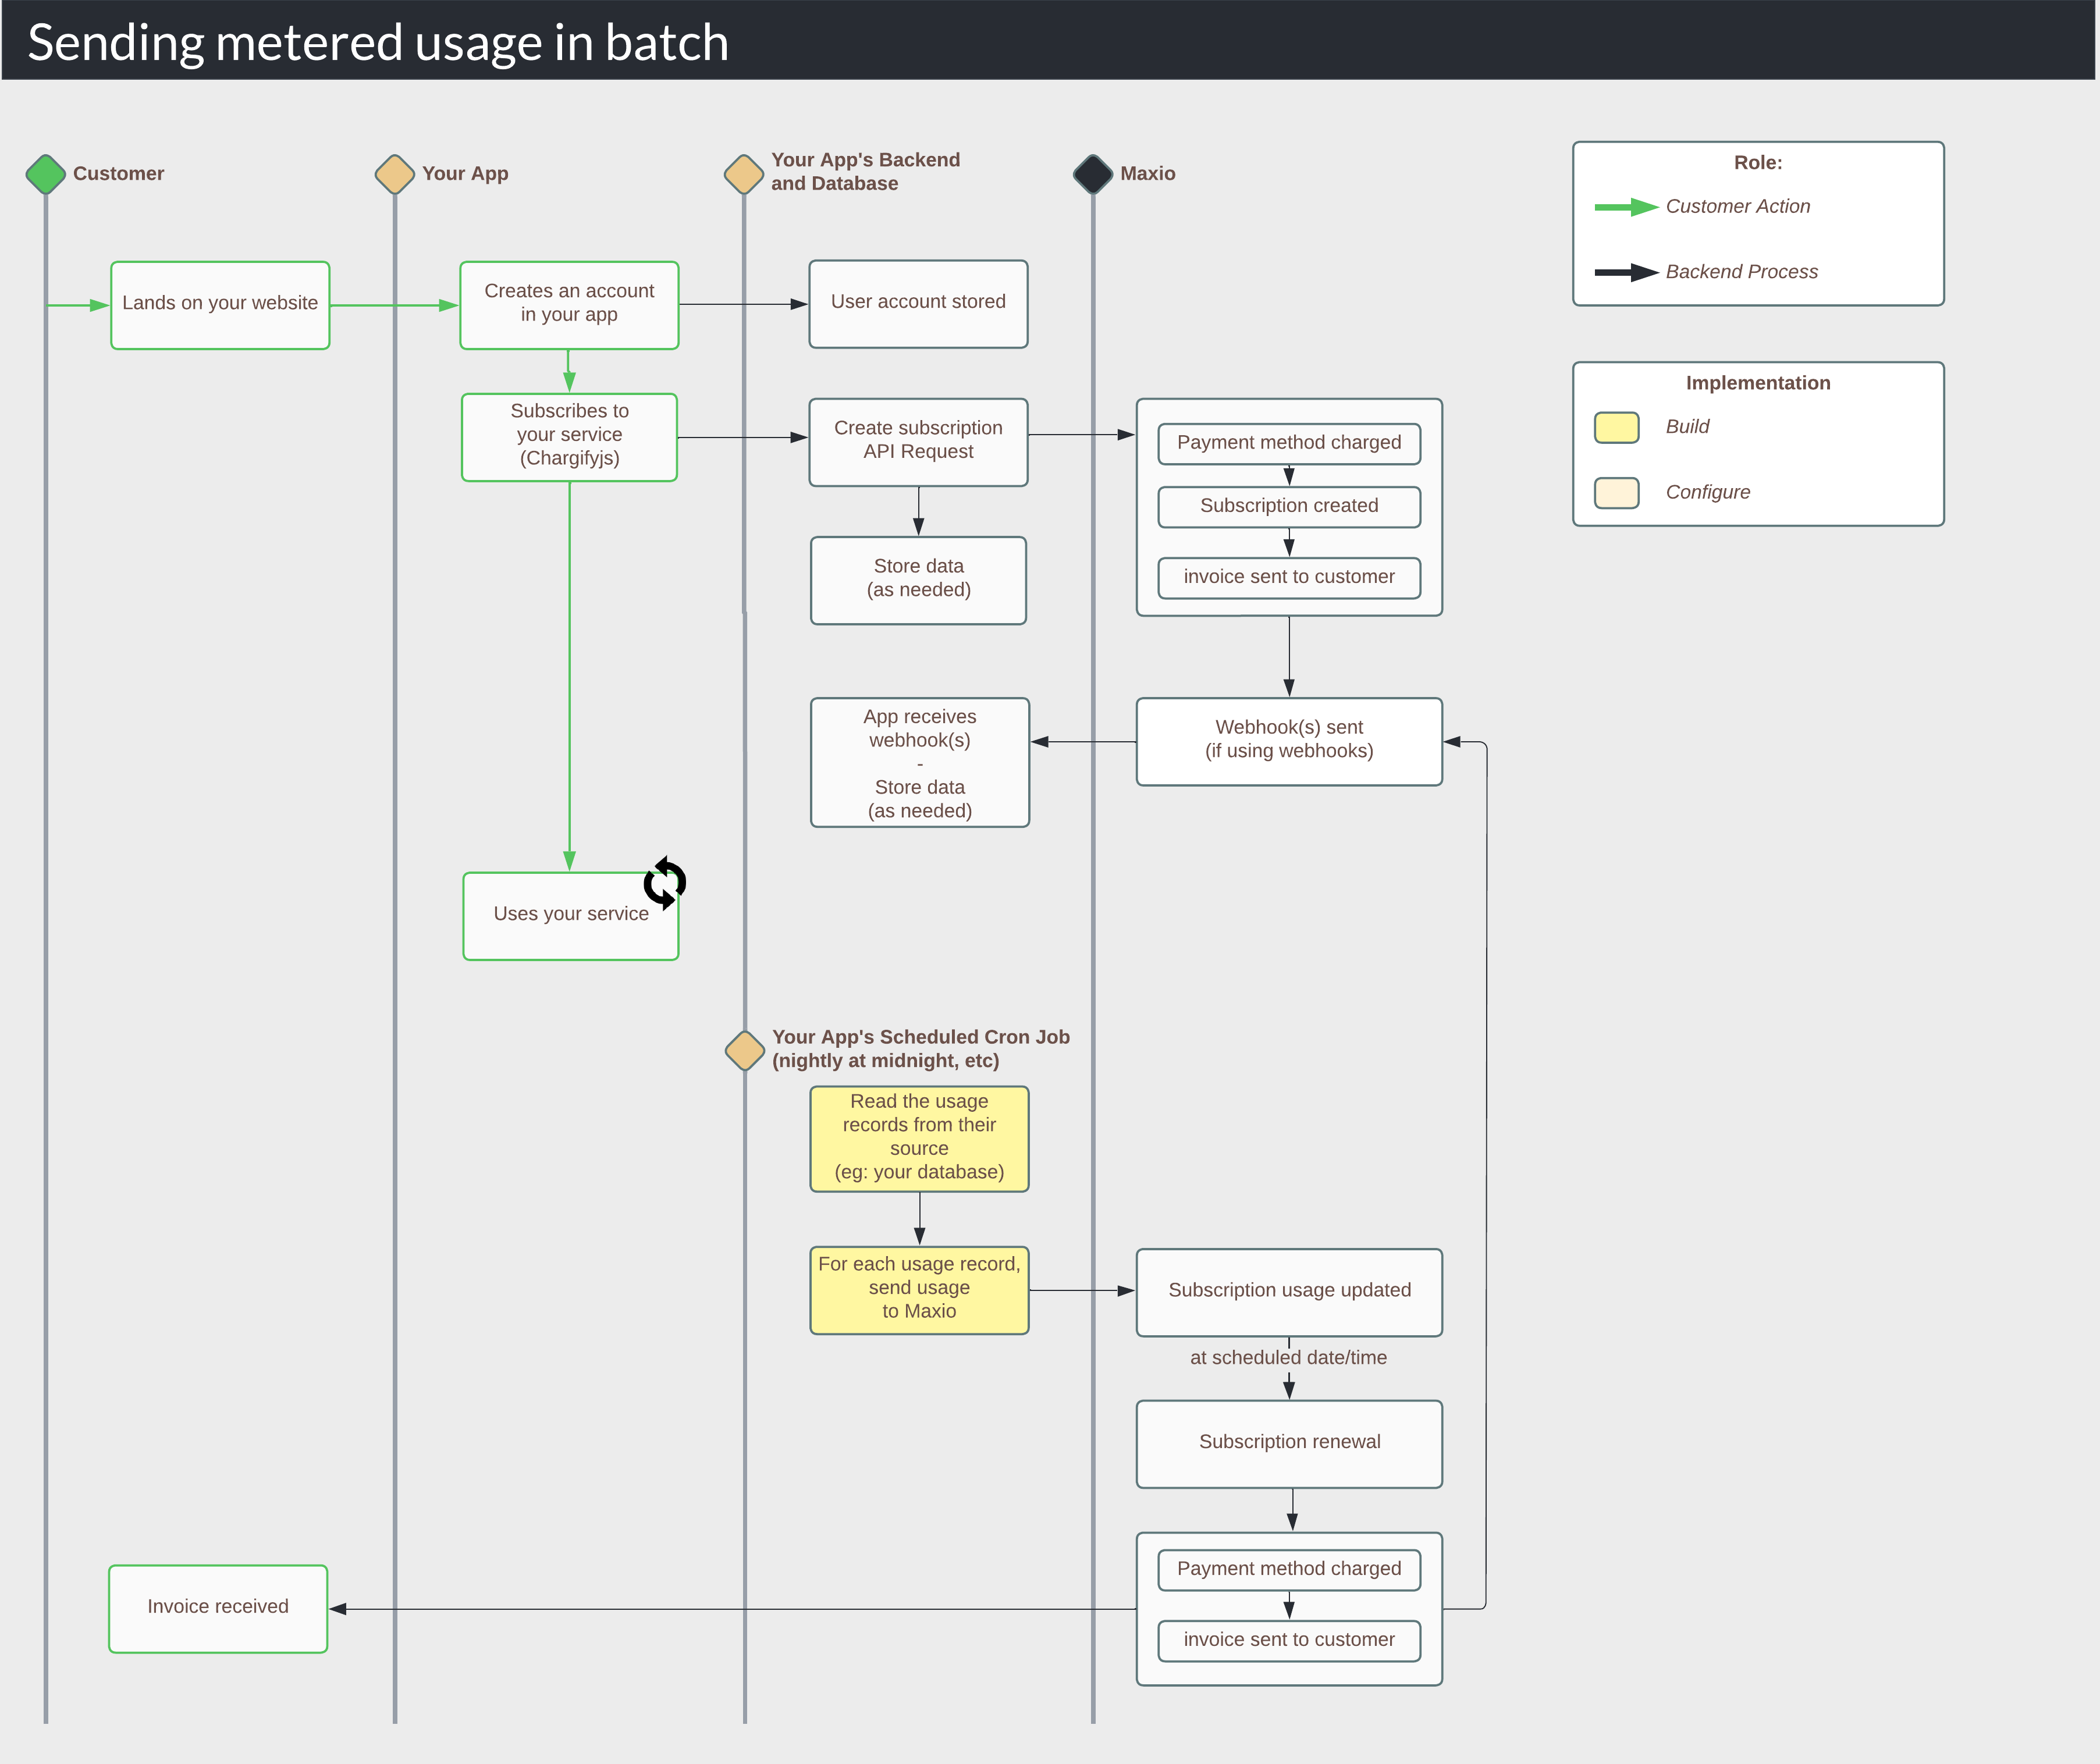
2. Determine your method - real time or batch
In the creating your catalog, you selected metered components to power your usage-based line items. These component types are best for any usage-based items that are basic, and billed in arrears. Now the question is, do you send this usage in real time as meaningful events happen in your application, or in batch on a scheduled cron job (such as nightly, every 4 hours, etc).
| Method | Best if |
| Real time | - You have a low usage volume (eg: a customer may use a 100 units of a service over the course of a month) |
| Batch | - You have large amounts of usage (eg: a customer may use a 1,000-10,000 units of a service over the course of a month) - You already have an existing batch process that sends usage to a previous billing system, and you'd like to simply replace it. - You use an iPaaS system, and it's easy to schedule workflows. - You are a developer experienced with cron jobs and prefer batch processing |
3. Build your API request
Whether sending usage in real time or batch, you will make the same API call. This is an API call to create usage, using the POST /usages endpoint. You need to know the
subscription_id and the metered component_id, and you pass the usage quantity , an optional price_point_id, and an optional memo.
# Create Usage - https://developers.chargify.com/docs/api-docs/9954fb40d117d-create-usage
require 'uri'
require 'net/http'
require 'openssl'

url = URI("https://subdomain.chargify.com/subscriptions/subscription_id/components/component_id/usages.json")

http = Net::HTTP.new(url.host, url.port)
http.use_ssl = true
http.verify_mode = OpenSSL::SSL::VERIFY_NONE

request = Net::HTTP::Post.new(url)
request["Content-Type"] = 'application/json'
request["Authorization"] = 'Basic BASE64APIKEY'
request.body = "{\n  \"usage\": {\n    \"quantity\": 1000,\n    \"price_point_id\": \"149416\",\n    \"memo\": \"My memo\"\n  }\n}"

response = http.request(request)
puts response.read_body
# Create Usage - https://developers.chargify.com/docs/api-docs/9954fb40d117d-create-usage
import http.client

conn = http.client.HTTPSConnection("subdomain.chargify.com")

payload = "{\n  \"usage\": {\n    \"quantity\": 1000,\n    \"price_point_id\": \"149416\",\n    \"memo\": \"My memo\"\n  }\n}"

headers = {
    'Content-Type': "application/json",
    'Authorization': "Basic BASE64APIKEY"
    }

conn.request("POST", "/subscriptions/subscription_id/components/component_id/usages.json", payload, headers)

res = conn.getresponse()
data = res.read()

print(data.decode("utf-8"))
// Create Usage - https://developers.chargify.com/docs/api-docs/9954fb40d117d-create-usage
var axios = require("axios").default;

var options = {
  method: 'POST',
  url: 'https://subdomain.chargify.com/subscriptions/subscription_id/components/component_id/usages.json',
  headers: {
    'Content-Type': 'application/json',
    Authorization: 'Basic BASE64APIKEY'
  },
  data: {usage: {quantity: 1000, price_point_id: '149416', memo: 'My memo'}}
};

axios.request(options).then(function (response) {
  console.log(response.data);
}).catch(function (error) {
  console.error(error);
});
// Create Usage - https://developers.chargify.com/docs/api-docs/9954fb40d117d-create-usage
$request = new HttpRequest();
$request->setUrl('https://subdomain.chargify.com/subscriptions/subscription_id/components/component_id/usages.json');
$request->setMethod(HTTP_METH_POST);

$request->setHeaders([
  'Content-Type' => 'application/json',
  'Authorization' => 'Basic BASE64APIKEY'
]);

$request->setBody('{
  "usage": {
    "quantity": 1000,
    "price_point_id": "149416",
    "memo": "My memo"
  }
}');

try {
  $response = $request->send();

  echo $response->getBody();
} catch (HttpException $ex) {
  echo $ex;
}
// Create Usage - https://developers.chargify.com/docs/api-docs/9954fb40d117d-create-usage
AsyncHttpClient client = new DefaultAsyncHttpClient();
client.prepare("POST", "https://subdomain.chargify.com/subscriptions/subscription_id/components/component_id/usages.json")
  .setHeader("Content-Type", "application/json")
  .setHeader("Authorization", "Basic BASE64APIKEY")
  .setBody("{\n  \"usage\": {\n    \"quantity\": 1000,\n    \"price_point_id\": \"149416\",\n    \"memo\": \"My memo\"\n  }\n}")
  .execute()
  .toCompletableFuture()
  .thenAccept(System.out::println)
  .join();

client.close();
// Create Usage - https://developers.chargify.com/docs/api-docs/9954fb40d117d-create-usage
var client = new HttpClient();
var request = new HttpRequestMessage
{
    Method = HttpMethod.Post,
    RequestUri = new Uri("https://subdomain.chargify.com/subscriptions/subscription_id/components/component_id/usages.json"),
    Headers =
    {
        { "Content-Type", "application/json" },
        { "Authorization", "Basic BASE64APIKEY" },
    },
    Content = new StringContent("{\n  \"usage\": {\n    \"quantity\": 1000,\n    \"price_point_id\": \"149416\",\n    \"memo\": \"My memo\"\n  }\n}")
    {
        Headers =
        {
            ContentType = new MediaTypeHeaderValue("application/json")
        }
    }
};
using (var response = await client.SendAsync(request))
{
    response.EnsureSuccessStatusCode();
    var body = await response.Content.ReadAsStringAsync();
    Console.WriteLine(body);
}
{
  "usage": {
    "id": 138522957,
    "memo": "My memo",
    "created_at": "2017-11-13T10:05:32-06:00",
    "price_point_id": 149416,
    "quantity": 1000,
    "component_id": 500093,
    "component_handle": "handle",
    "subscription_id": 22824464
  }
}
4. Add the API call to your application code
Server-sideNext, you'll need to put the call in the right place inside your code, and make it dynamic for all
With real time:
1. Your backend script processes the event
2. It verifies the event is successful (if you only send usage on success)
3. It sends the usage API request to Maxio
With batch:
1. Your scheduled cron job is initialized at a specific time (eg: nightly at midnight)
2. It knows the last record number (typically a row ID in your database) or timestamp where it last was processed. It picks up where it left off.
3. It reads through each record (typically in your database) and sends the usage API request to Maxio
subscription_id values and component_id values. The general structure is:With real time:
1. Your backend script processes the event
2. It verifies the event is successful (if you only send usage on success)
3. It sends the usage API request to Maxio
With batch:
1. Your scheduled cron job is initialized at a specific time (eg: nightly at midnight)
2. It knows the last record number (typically a row ID in your database) or timestamp where it last was processed. It picks up where it left off.
3. It reads through each record (typically in your database) and sends the usage API request to Maxio
5. Test
Create several subscriptions, each for your real use cases with usage. Simulate action in your app that triggers your usage workflow.
With real time:
1. Test that the usage is immediately sent to Maxio.
2. Ensure that after the event occurs in your app, the usage goes to the proper subscriptions.
With batch:
1. Set your batch process to be triggered (so you don't have to wait until the real time).
2. Test that the usage is immediately sent to Maxio.
3. Ensure that the usage goes to the proper subscriptions.
4. Once 1-3 work, turn on your scheduled job, and let it run naturally. Simulate some usage in your app, and after your scheduled job's run time, verify it worked.
Summary
- Feature
- EBB (using Events-based billing components)
- You Need
- Developer experienced with APIs; a web app with Server-side code
- Code
- Yes
- Difficulty
- ◉◉◉◎◎
Send usage with EBB
Sending usage to Maxio is one of the most important elements of your usage-based billing implementation. Events-based billing is useful for high-volume, advanced usage-based line items.
1. How it works
DiagramHere is an example of the usage billing lifecycle for sending usage in real time and in batches.
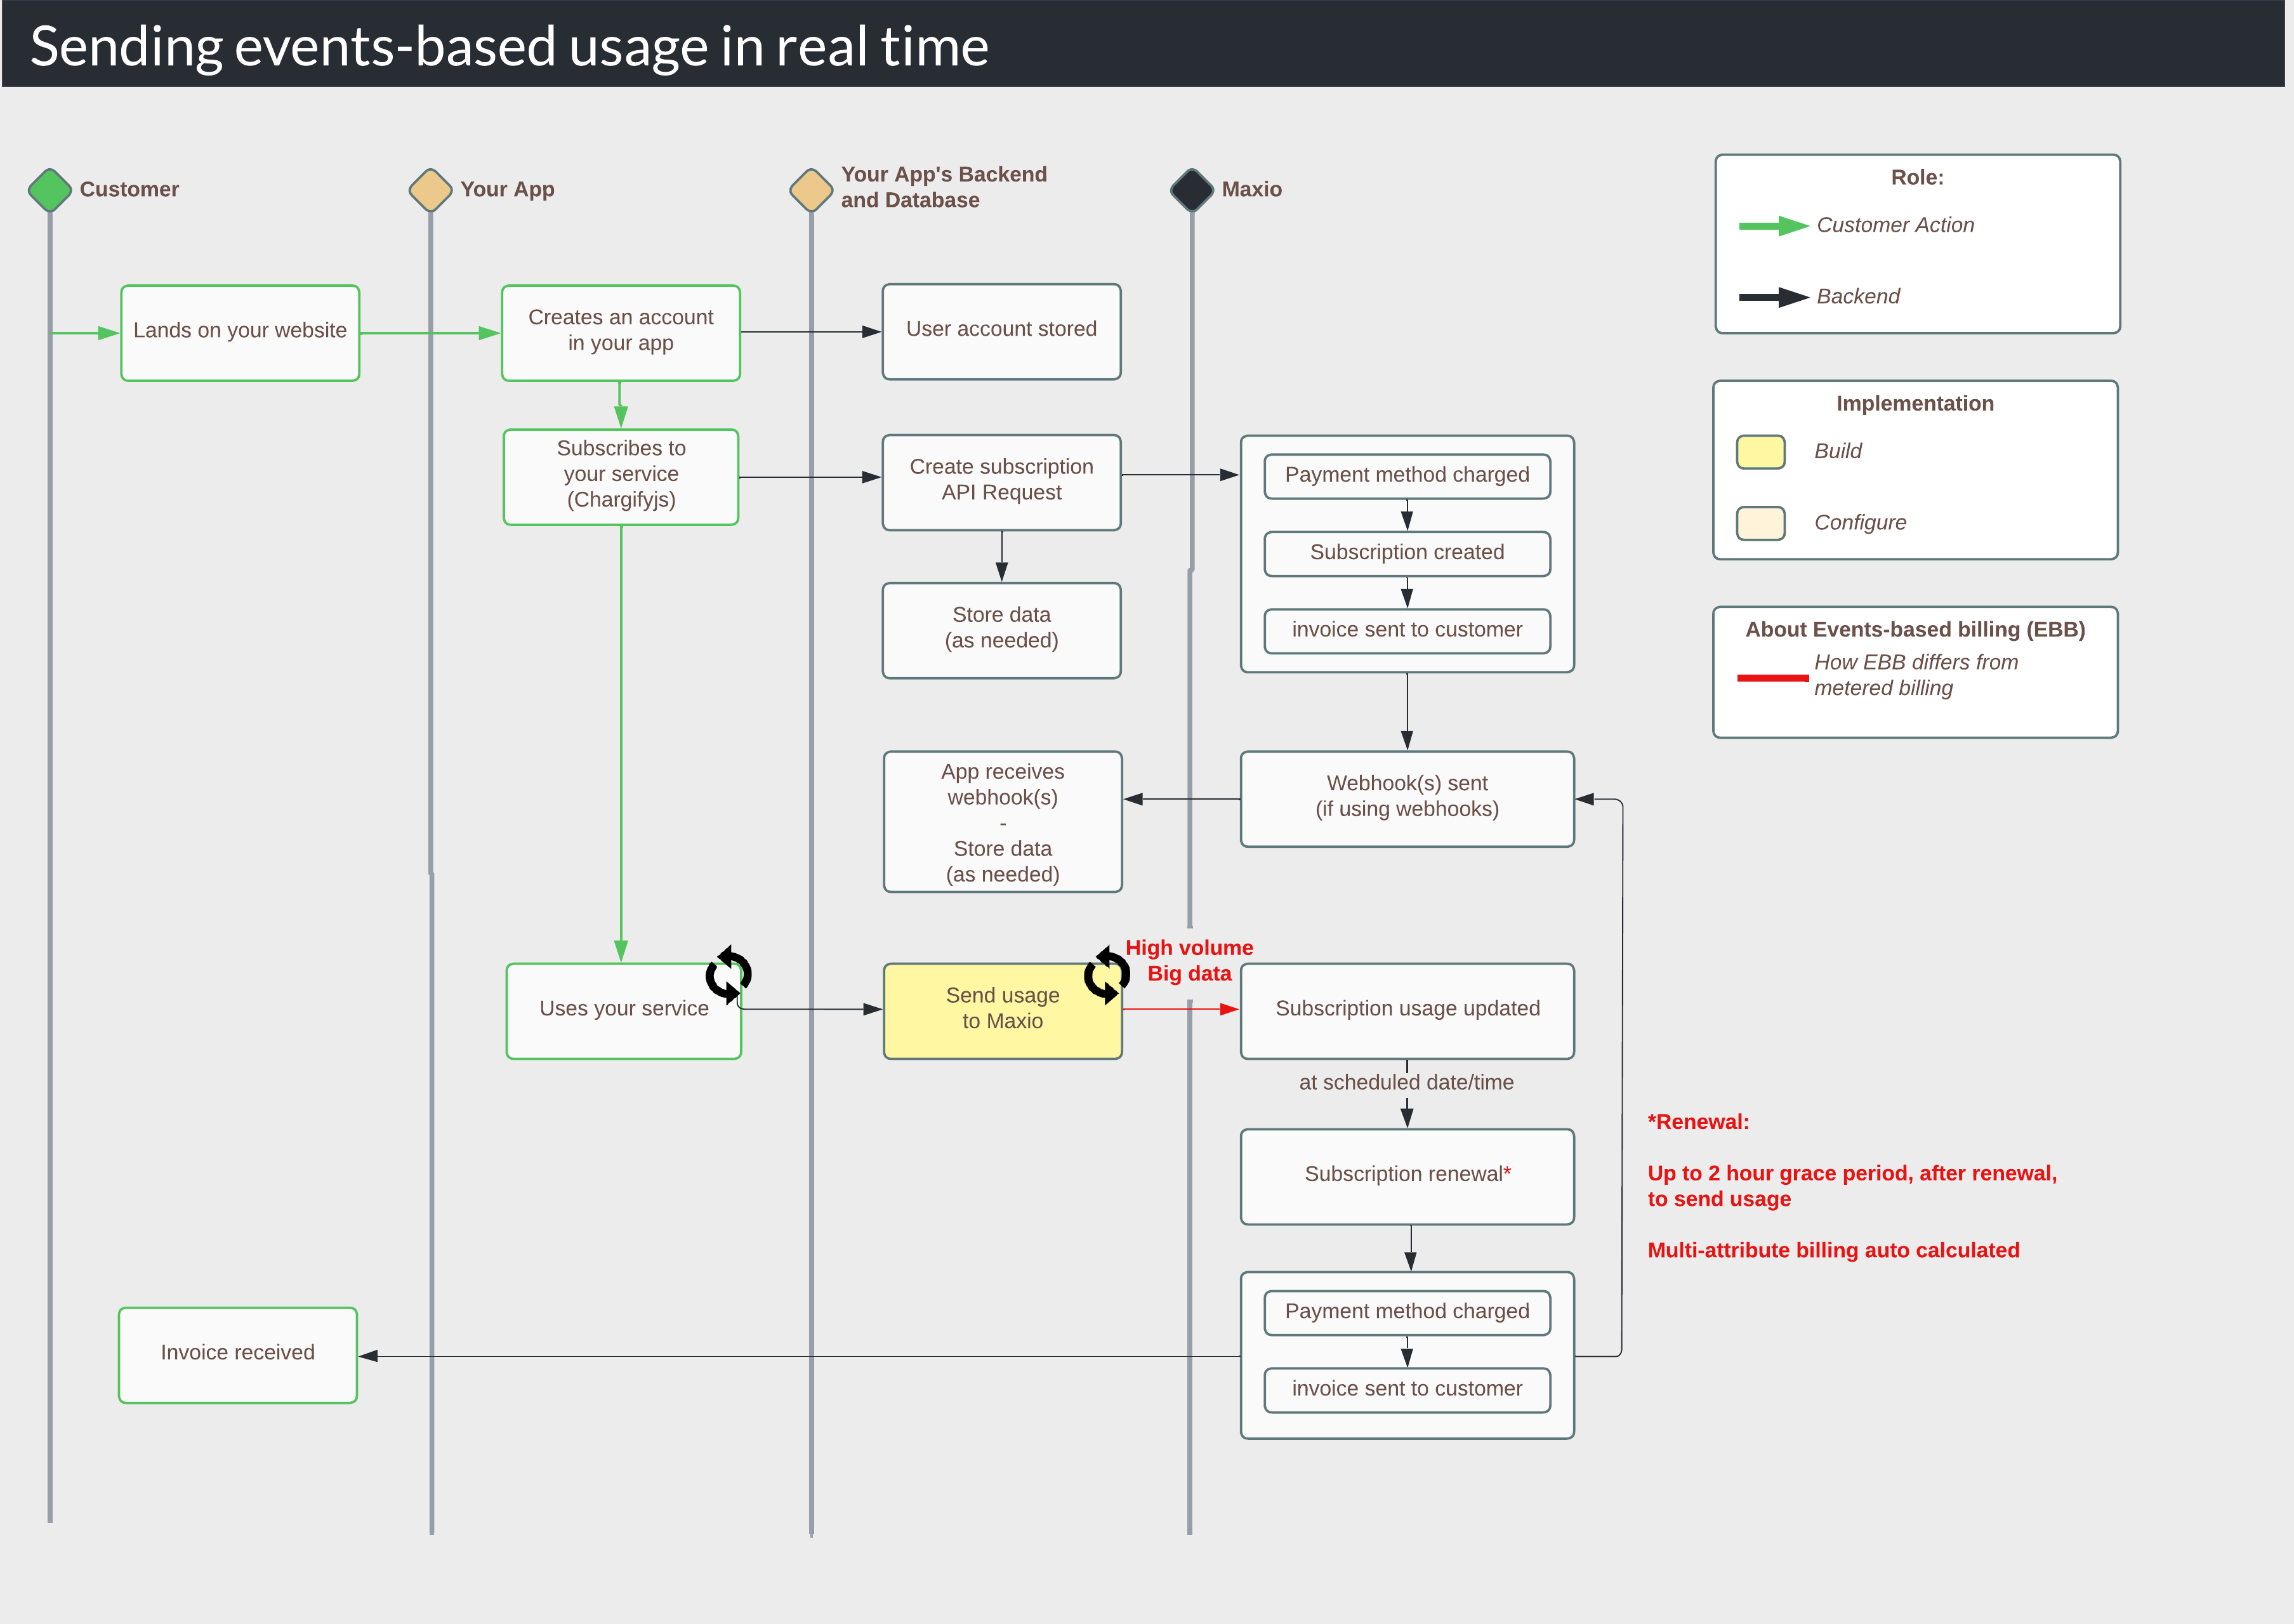
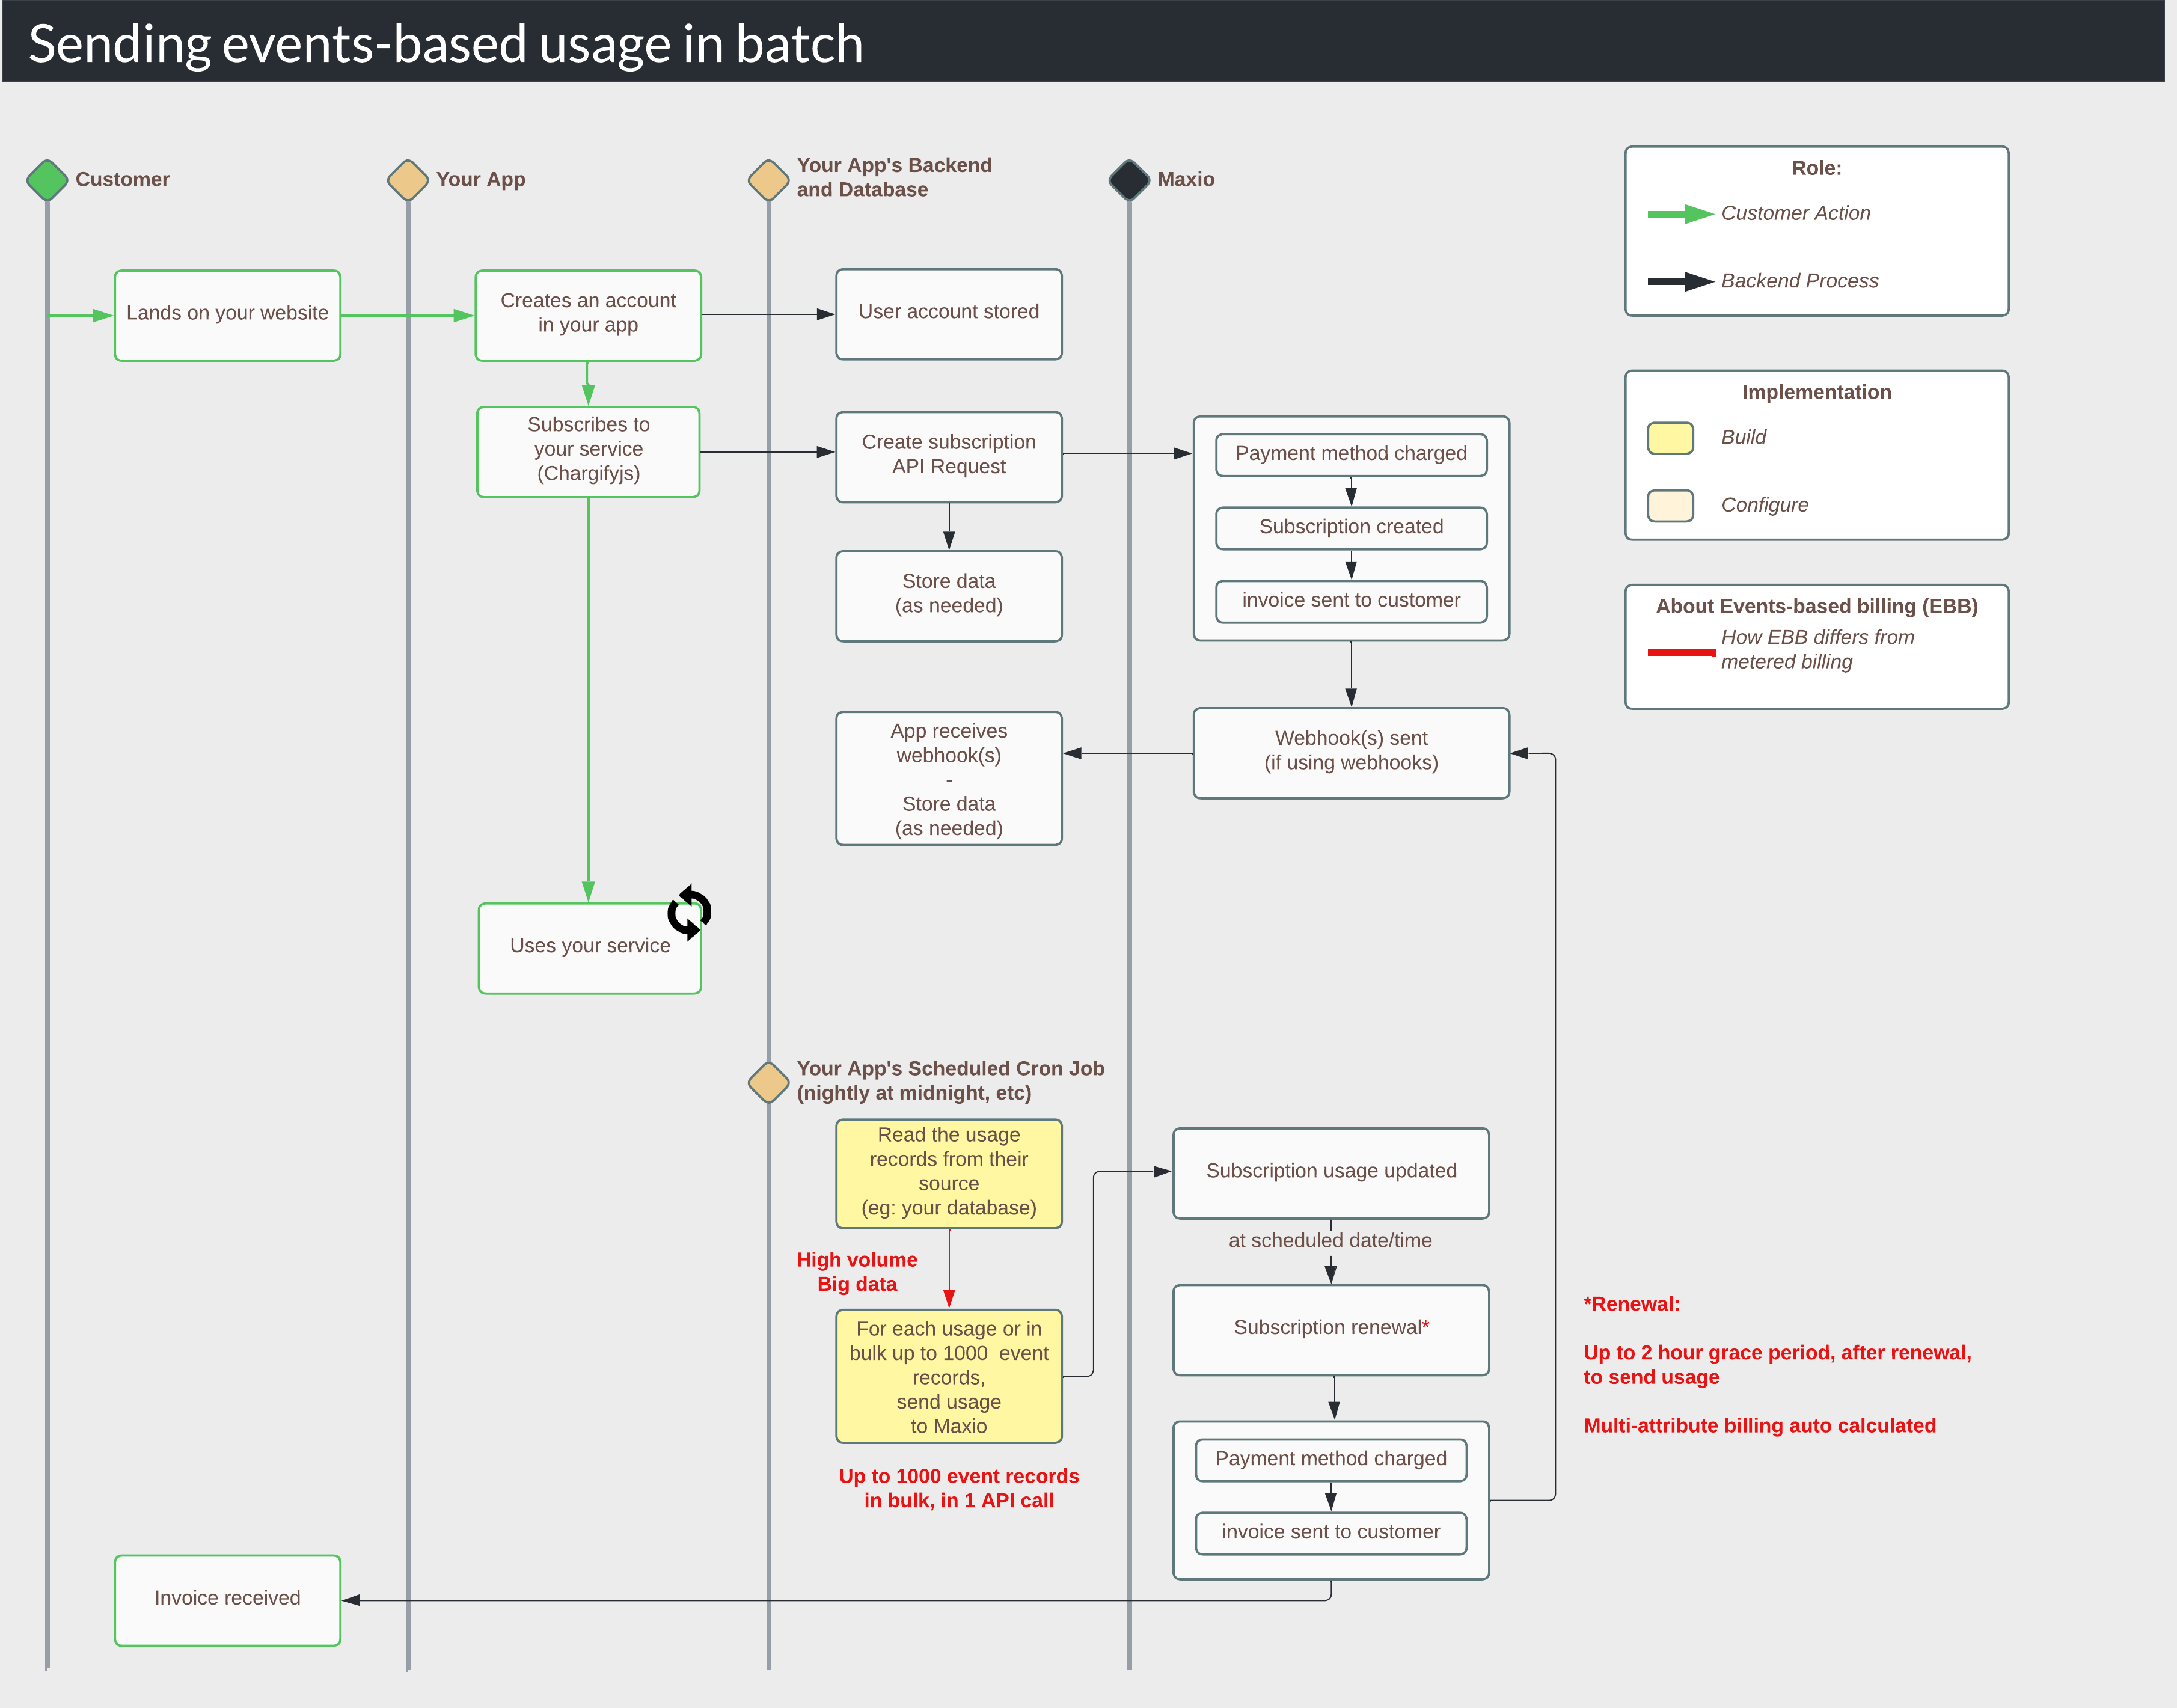
2. Determine your method - real time or batch
In the creating your catalog, you selected event-based components to power your usage-based line items. These component types are best for any usage-based items that are advanced and/or have a multi-attribute rating system, and/or you use big data, and billed in arrears. Now the question is, do you send this usage in real time as meaningful events happen in your application, or in batch on a scheduled cron job (such as nightly, every 4 hours, etc).
| Method | Best if |
| Real time | - You want to stream in usage as it happens in your system |
| Batch | - You already have an existing batch process that sends usage to a previous billing system, and you'd like to simply replace it. - You are a developer experienced with cron jobs and prefer batch processing - You already have a process in place where you bulk send events. With EBB, you can send up to 1000 events, in a single API call, at one time. |
3. Configure stream and metric
This should be complete already, based on your Product Catalog setup. If you have not completed this yet, see the guide for Build Your Catalog > Get Started > Configure Events-based Billing.
This step must be completed before continuing to the next step.
This step must be completed before continuing to the next step.
4. Get your events API endpoint and structure your json
The events API is structured differently than typical API endpoints. This allows for higher volume, which allows you to stream higher volume usage.
First, find your events API endpoint. Go to Events > Streams > click the Stream > click "URL". It will look like this:
Now you have the API endpoint, such as:
Next, have an example of your real JSON.
First, find your events API endpoint. Go to Events > Streams > click the Stream > click "URL". It will look like this:
Now you have the API endpoint, such as:
https://events.chargify.com/SUBDOMAIN/events/STREAMHANDLENext, have an example of your real JSON.
//POST to https://events.chargify.com/SUBDOMAIN/events/STREAMHANDLE
//Notice that you can send your own account_id, assuming you configured ebb to be like this. This means you do not have to store a Chargify-generated ID in your app. As long as your account_id for a user, is the subscription_reference for their Chargify subscription, there is no subscription ID storage required.
//JSON
{
  "account_id": "acct_123456" //your own ID, also on the Chargify subscription_reference
  "clicks": 100,
  "other": "other-thing"
}
5. Build your API request
This is an API call to create events-based usage, using the /events endpoint for single events and /events/bulk for bulk events up to 1,000 at a time. Set your events API endpoint, and your JSON.
# Event Ingestion - https://developers.chargify.com/docs/api-docs/b8ffb590f236a-event-ingestion
require 'uri'
require 'net/http'
require 'openssl'

url = URI("https://events.chargify.com/subdomain/events/api_handle.json")

http = Net::HTTP.new(url.host, url.port)
http.use_ssl = true
http.verify_mode = OpenSSL::SSL::VERIFY_NONE

request = Net::HTTP::Post.new(url)
request["Content-Type"] = 'application/json'
request["Authorization"] = 'Basic BASE64APIKEY'
request.body = "{\n  \"chargify\": {\n    \"subscription_id\": 1,\n    \"timestamp\": \"2020-02-27T17:45:50-05:00\"\n  },\n  \"messages\": 150,\n  \"country\": \"US\"\n}"

response = http.request(request)
puts response.read_body
# Event Ingestion - https://developers.chargify.com/docs/api-docs/b8ffb590f236a-event-ingestion
import http.client

conn = http.client.HTTPSConnection("events.chargify.com")

payload = "{\n  \"chargify\": {\n    \"subscription_id\": 1,\n    \"timestamp\": \"2020-02-27T17:45:50-05:00\"\n  },\n  \"messages\": 150,\n  \"country\": \"US\"\n}"

headers = {
    'Content-Type': "application/json",
    'Authorization': "Basic BASE64APIKEY"
    }

conn.request("POST", "/subdomain/events/api_handle.json", payload, headers)

res = conn.getresponse()
data = res.read()

print(data.decode("utf-8"))
// Event Ingestion - https://developers.chargify.com/docs/api-docs/b8ffb590f236a-event-ingestion
var axios = require("axios").default;

var options = {
  method: 'POST',
  url: 'https://events.chargify.com/subdomain/events/api_handle.json',
  headers: {
    'Content-Type': 'application/json',
    Authorization: 'Basic BASE64APIKEY'
  },
  data: {
    chargify: {subscription_id: 1, timestamp: '2020-02-27T17:45:50-05:00'},
    messages: 150,
    country: 'US'
  }
};

axios.request(options).then(function (response) {
  console.log(response.data);
}).catch(function (error) {
  console.error(error);
});
// Event Ingestion - https://developers.chargify.com/docs/api-docs/b8ffb590f236a-event-ingestion
$request = new HttpRequest();
$request->setUrl('https://events.chargify.com/subdomain/events/api_handle.json');
$request->setMethod(HTTP_METH_POST);

$request->setHeaders([
  'Content-Type' => 'application/json',
  'Authorization' => 'Basic BASE64APIKEY'
]);

$request->setBody('{
  "chargify": {
    "subscription_id": 1,
    "timestamp": "2020-02-27T17:45:50-05:00"
  },
  "messages": 150,
  "country": "US"
}');

try {
  $response = $request->send();

  echo $response->getBody();
} catch (HttpException $ex) {
  echo $ex;
}
// Event Ingestion - https://developers.chargify.com/docs/api-docs/b8ffb590f236a-event-ingestion
AsyncHttpClient client = new DefaultAsyncHttpClient();
client.prepare("POST", "https://events.chargify.com/subdomain/events/api_handle.json")
  .setHeader("Content-Type", "application/json")
  .setHeader("Authorization", "Basic BASE64APIKEY")
  .setBody("{\n  \"chargify\": {\n    \"subscription_id\": 1,\n    \"timestamp\": \"2020-02-27T17:45:50-05:00\"\n  },\n  \"messages\": 150,\n  \"country\": \"US\"\n}")
  .execute()
  .toCompletableFuture()
  .thenAccept(System.out::println)
  .join();

client.close();
// Event Ingestion - https://developers.chargify.com/docs/api-docs/b8ffb590f236a-event-ingestion
var client = new HttpClient();
var request = new HttpRequestMessage
{
    Method = HttpMethod.Post,
    RequestUri = new Uri("https://events.chargify.com/subdomain/events/api_handle.json"),
    Headers =
    {
        { "Authorization", "Basic BASE64APIKEY" },
    },
    Content = new StringContent("{\n  \"chargify\": {\n    \"subscription_id\": 1,\n    \"timestamp\": \"2020-02-27T17:45:50-05:00\"\n  },\n  \"messages\": 150,\n  \"country\": \"US\"\n}")
    {
        Headers =
        {
            ContentType = new MediaTypeHeaderValue("application/json")
        }
    }
};
using (var response = await client.SendAsync(request))
{
    response.EnsureSuccessStatusCode();
    var body = await response.Content.ReadAsStringAsync();
    Console.WriteLine(body);
}
# Bulk Event Ingestion - https://developers.chargify.com/docs/api-docs/f8128bcd44d55-bulk-event-ingestion
require 'uri'
require 'net/http'
require 'openssl'

url = URI("https://events.chargify.com/subdomain/events/api_handle/bulk.json")

http = Net::HTTP.new(url.host, url.port)
http.use_ssl = true
http.verify_mode = OpenSSL::SSL::VERIFY_NONE

request = Net::HTTP::Post.new(url)
request["Content-Type"] = 'application/json'
request["Authorization"] = 'Basic BASE64APIKEY'
request.body = "[\n  {}\n]"

response = http.request(request)
puts response.read_body
# Bulk Event Ingestion - https://developers.chargify.com/docs/api-docs/f8128bcd44d55-bulk-event-ingestion
import http.client

conn = http.client.HTTPSConnection("events.chargify.com")

payload = "[\n  {}\n]"

headers = {
    'Content-Type': "application/json",
    'Authorization': "Basic BASE64APIKEY"
    }

conn.request("POST", "/subdomain/events/api_handle/bulk.json", payload, headers)

res = conn.getresponse()
data = res.read()

print(data.decode("utf-8"))
// Bulk Event Ingestion - https://developers.chargify.com/docs/api-docs/f8128bcd44d55-bulk-event-ingestion
var axios = require("axios").default;

var options = {
  method: 'POST',
  url: 'https://events.chargify.com/subdomain/events/api_handle/bulk.json',
  headers: {
    'Content-Type': 'application/json',
    Authorization: 'Basic BASE64APIKEY'
  },
  data: [{}]
};

axios.request(options).then(function (response) {
  console.log(response.data);
}).catch(function (error) {
  console.error(error);
});
// Bulk Event Ingestion - https://developers.chargify.com/docs/api-docs/f8128bcd44d55-bulk-event-ingestion
$request = new HttpRequest();
$request->setUrl('https://events.chargify.com/subdomain/events/api_handle/bulk.json');
$request->setMethod(HTTP_METH_POST);

$request->setHeaders([
  'Content-Type' => 'application/json',
  'Authorization' => 'Basic BASE64APIKEY'
]);

$request->setBody('[
  {}
]');

try {
  $response = $request->send();

  echo $response->getBody();
} catch (HttpException $ex) {
  echo $ex;
}
// Bulk Event Ingestion - https://developers.chargify.com/docs/api-docs/f8128bcd44d55-bulk-event-ingestion
AsyncHttpClient client = new DefaultAsyncHttpClient();
client.prepare("POST", "https://events.chargify.com/subdomain/events/api_handle/bulk.json")
  .setHeader("Content-Type", "application/json")
  .setHeader("Authorization", "Basic BASE64APIKEY")
  .setBody("[\n  {}\n]")
  .execute()
  .toCompletableFuture()
  .thenAccept(System.out::println)
  .join();

client.close();
// Bulk Event Ingestion - https://developers.chargify.com/docs/api-docs/f8128bcd44d55-bulk-event-ingestion
var client = new HttpClient();
var request = new HttpRequestMessage
{
    Method = HttpMethod.Post,
    RequestUri = new Uri("https://events.chargify.com/subdomain/events/api_handle/bulk.json"),
    Headers =
    {
        { "Authorization", "Basic BASE64APIKEY" },
    },
    Content = new StringContent("[\n  {}\n]")
    {
        Headers =
        {
            ContentType = new MediaTypeHeaderValue("application/json")
        }
    }
};
using (var response = await client.SendAsync(request))
{
    response.EnsureSuccessStatusCode();
    var body = await response.Content.ReadAsStringAsync();
    Console.WriteLine(body);
}
6. Add the API call to your application code
Server-sideNext, you'll need to put the call in the right place inside your code. The general structure is:
With real time:
1. Your backend script processes the event
2. It verifies the event is successful (if you only send usage on success)
3. It sends the usage API request to Maxio
With batch:
1. Your scheduled cron job is initialized at a specific time (eg: nightly at midnight)
2. It knows the last record number (typically a row ID in your database) or timestamp where it last was processed. It picks up where it left off.
3. It reads through each record (typically in your database) and sends the usage API request to Maxio; or, it reads up to 1000 records, and sends them in bulk within 1 API call.
7. Test
Create several subscriptions, each for your real use cases with usage. Simulate action in your app that triggers your usage workflow.
With real time:
1. Test that the usage is immediately sent to Maxio.
2. Ensure that after the event occurs in your app, the usage goes to the proper subscriptions.
With batch:
1. Set your batch process to be triggered (so you don't have to wait until the real time).
2. Test that the usage is immediately sent to Maxio.
3. Ensure that the usage goes to the proper subscriptions.
4. Once 1-3 work, turn on your scheduled job, and let it run naturally. Simulate some usage in your app, and after your scheduled job's run time, verify it worked.
With real time:
1. Test that the usage is immediately sent to Maxio.
2. Ensure that after the event occurs in your app, the usage goes to the proper subscriptions.
With batch:
1. Set your batch process to be triggered (so you don't have to wait until the real time).
2. Test that the usage is immediately sent to Maxio.
3. Ensure that the usage goes to the proper subscriptions.
4. Once 1-3 work, turn on your scheduled job, and let it run naturally. Simulate some usage in your app, and after your scheduled job's run time, verify it worked.