This guide will help you implement 1 of 3 Billing Portal login methods. When you're finished, your customers will be able to log in to their portal.
Email invite Website link One-click sign on
Summary - Email Invite
- Feature
- Billing Portal
- You Need
- Billing Portal enabled; a test subscription
- Code
- No
- Difficulty
- ◉◎◎◎◎
Configure an Invite via Email Diagram
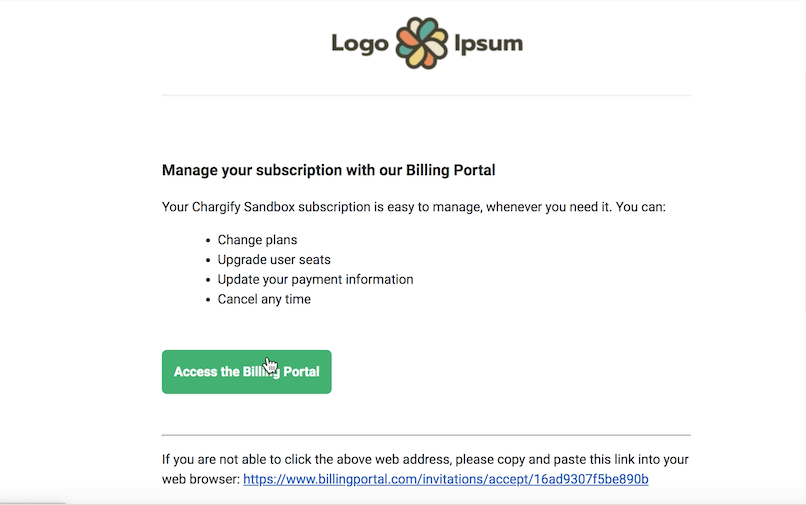
This method is the easiest to implement. Your users will simply receive an invite email, with a login link, upon signing up for your services.
-
Configure automatic email invitations
Go to Config > Settings > Billing Portal. Under "Subscriber Invitations", select "Automatic invitation emails for new subscribers". This is typically enabled by default.
- Configure management links
Go to Config > Settings > Billing Portal. Under "Management Links", select "Require customers verify their email before logging in". This is typically enabled by default.
- Enable 'Allow Password Logins' if you want the user flow to look like the Request Password image below.
- Do not enable 'Allow Password Logins' if you want the user flow to look like the 'Do not request password' image.
Request password

Do not request password

Need a quickstart template? Try this one. Get the code

Summary - Website Link
- Advanced Billing Feature
- Billing Portal
- You Need
- Billing Portal enabled; a test subscription
- Code
- Basic HTML (create a link)
- Difficulty
- ◉◉◎◎◎
Implement a Link from your Website Try it out Diagram
This method is best for businesses who do not have user logins to their website, but still want to link customers to the Billing Portal from their website.
This will walk you through how to determine your URL.
-
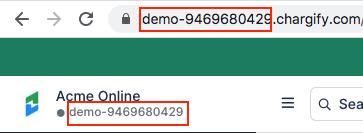
Get your Subdomain
When you are logged into Advanced Billing, go into your Site Dashboard. On any page, you will see the URL. The subdomain is shown in red below.
- Structure portal link
The URL will have this structure:https://www.billingportal.com/s/SUBDOMAIN
With your subdomain, it will look like:https://www.billingportal.com/s/demo-9469680429/login/password -
Select link type
To link to the main login page, use:https://www.billingportal.com/s/SUBDOMAIN/login/password
To link to the page, where a user can request a login link, use:https://www.billingportal.com/s/SUBDOMAIN/login/magic
If you're unsure, create these real links with your subdomain, and test them out. Once you know which type you prefer, continue to the next step.
HTML Client-side
-
Write the HTML
Here is an example linking to the main login page:
<a href="https://www.billingportal.com/s/SUBDOMAIN/login/password" target="_blank">Manage Your Subscription</a>
Here is an example linking to the request-a-login page with a prefilled email:
<a href="https://www.billingportal.com/s/SUBDOMAIN/login/magic?email=EMAILHERE" target="_blank">Manage Your Subscription</a> - Edit the call to action
The example says "Manage Your Subscription". Change this as needed. -
Deploy your code
You're finished.
Summary - One click sign on
- Advanced Billing Feature
- Billing Portal
- You Need
- Billing Portal enabled; a test subscription
- Code
- Yes - backend and frontend
- Difficulty
- ◉◉◉◎◎
Implement One-click Sign On Try it out Diagram
This method is best if you have a web app, and you want your logged-in users to click a button to access their Billing Portal.
1. Unique User IDs - A unique user ID for each user, stored in your database (common).
2. Store IDs on Customer Reference - The unique user ID is stored in Advanced Billing as the Customer Reference.
3. Enable Portal Link Expiry - Maxio Support enables the Billing Portal Link feature - This allows you to create links that expire quickly, such as 30 seconds. Email support@maxio.com to get it enabled.
Client-side-
Create the frontend URL
Here is an example of the structure. This link will point to another URL (in the next step), hosted on your servers, that will trigger a backend script. Make sure this frontend URL contains a dynamic user ID that is acceptable to be exposed client side.
<a href="https://www.yourapp.com/path?user_id=DYNAMIC-USER-ID" target="_blank">Manage Your Subscription</a> -
Place the URL in your app
Add the URL to the proper place in your app. Typically, this is inside a "My Account" section.
- Optional - Style the link as a button
If you have existing button css, add it.
API Server-side
-
Read Customer by Reference and parse the Customer ID See API Endpoint
Perform a GET, with your dynamic user ID. In the response, parse the customer ID (eg: 123456789).
-
Read Billing Portal Link by Customer ID See API Endpoint
Perform a GET. In the response, parse the url.
//example response
//this url is the user's portal link
{
  "url": "https://www.billingportal.com/manage/19804639/1517596469/bd16498719a7d3e6",
  ...
}
- Redirect the user to the portal url
In your code, redirect to the link from the API response.
FAQs
1. Can the Billing Portal be iframed, cnamed, or whitelabeled? No.