This implementation guide has two parts. Part 1: Selecting your subscription management (sub-mgmt) method. Part 2: Designing and diagramming your post management flow. When you’re finished, you will know which management method to use for end-customers, which to use for your staff, and have finished diagrams for your Post-Management Flows.
Part 1: Choose your method Part 2: Post sub-mgmt workflow
Summary
- Feature
- All subscription management methods: Billing Portal, API, Advanced Billing Admin UI, Salesforce, HubSpot
- You Need
- An understanding of how end-customers, and your staff, manage subscriptions; your post-management flows (if any).
- Code
- No
- Difficulty
- ◉◎◎◎◎
Self-Assessment 1: Subscription Management Methods
In this Self-Assessment, you will review Advanced Billing's mgmt methods, and select the best method for your business.
You most likely have an idea of what method you want to use. Before implementing, make sure to review the Subscription Management Overview, to confirm all feature availability.
If your method from Part 1 is Billing Portal, how do you want your users to authenticate into it?
|
Answer |
How it Works |
|
Email Invite |
When a new subscription is created, a Billing Portal Invite email is automatically sent to the user, and the email contains a one-time access link to user Bililng Portal. Upon clicking the link, the user is logged in for the first time, and they are prompted to set a password. For each subsequent login, the user signs in with their email (the one used when signing up for their subscription) and password. |
|
Login Page |
On your website (typically in a menu, header bar, or footer bar), link directly to the main login page for your company's Billing Portal. The user signs in with their email (the one used when signing up for their subscription) and password. |
|
In App Button |
Inside your web app, a logged in user clicks a “Manage My Subscription” button. When clicked, a new browser window opens, and the Billing Portal loads. |
Based on your research in step 1 and 2, and based on your answer to step 3, find your guide. Below this chart, find your diagram.
|
If you chose... |
and authentication is... |
Your guide is... |
| Billing Portal | Email Invite | 1. Configure the Billing Portal 2. Configure login with Email Invite |
| Login Page |
1. Configure the Billing Portal |
|
| In App Button |
1. Configure the Billing Portal |
|
| API | n/a (api is already in your app) | Build your own portal with the API |
|
None |
n/a (no users) |
n/a |
|
Advanced Billing Admin UI |
n/a (Staff) |
Guide does not yet exist. These features are prebuilt and straightforward to use. For assistance, please ask your IC. |
|
Salesforce |
n/a (Staff) |
Guide does not yet exist. These features are prebuilt and straightforward to use. For assistance, please ask your IC. |
|
HubSpot |
n/a (Staff) |
Guide does not yet exist. These features are prebuilt and straightforward to use. For assistance, please ask your IC. |
Design & Diagram: Your Post Subscription Management Workflow
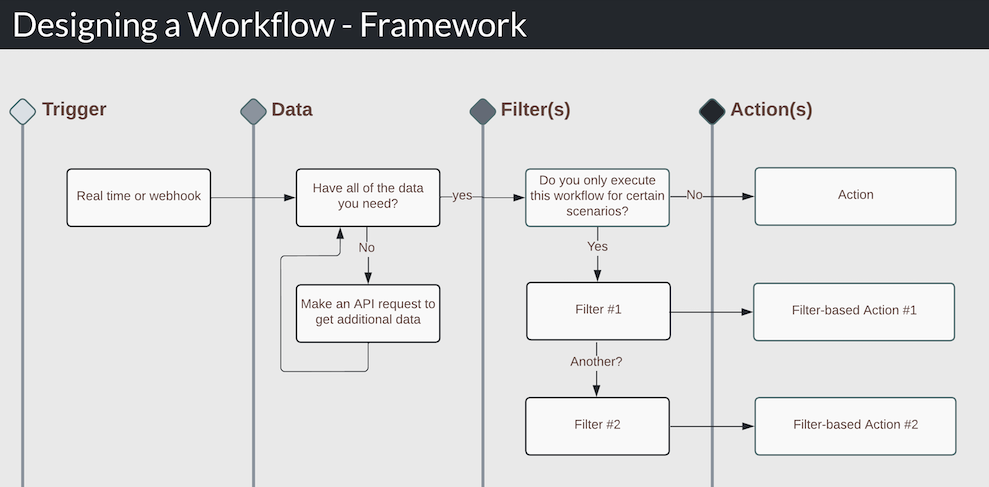
Designing your post subscription management workflow is an important step, and typically one of the most difficult. To help, we're sharing a simple framework to think about your workflow.
Workflows can be complex, but this framework will help you simplify. Workflows typically have 4 parts -- Trigger, Data, Filter, Action.
| Step | Name | Description |
| 1 | Trigger |
How the workflow begins. Typically an Advanced Billing webhook (or perhaps real-time if you're using Chargifyjs). |
| 2 | Data |
Determining the data you need, finding where it exists within Advanced Billing data. Ask yourself if you have all of the data you need from the trigger step. If yes, continue. If not, make an API request to fetch any remaining data. |
| 3 | Filter(s) |
Add optional filter(s), that match criteria you care about. Example: if the customer signs up to the bronze plan, continue the workflow. If gold plan, do not continue. |
| 4 | Action |
Perform the action you care about. This could be an Advanced Billing Action (an API request to Advanced Billing) or a Database Action (an update to your database). |
Using the framework, we can ask simple questions to guide us through our thought process. Real workflow design can be much more complex than this, but this framework can help organize your thoughts.
Start diagramming your workflow. Depending on your plan and onboarding package, if you have questions about which webhooks or APIs to use, ask your implementation consultant.
There are 3 implementation methods for any type of workflow.
| Method | Select if... | Example |
| No Code | You already know the system that will power the workflow for you, or you hire a developer. | You hire a developer. |
| Low Code | You already know the system that will power the workflow for you, and some small code is required. | Zapier |
Custom CodeMost commonDevelopers
|
You, or your team, are developers who plan on writing custom code to build the workflow. | You build an endpoint in your app that accepts Advanced Billing webhooks and executes the workflow. |
You're ready to get started. For full examples, see Building Workflows with APIs and Webhooks.
FAQs
-
Can Advanced Billing help me build my workflow?
No. Advanced Billing is a Product-focused company, rather than Custom-service-focused.
-
Can Advanced Billing help me determine which API endpoints and webhooks to use?
Yes, depending on your Advanced Billing Onboarding Plan. Ask your Implementation Consultant.