Streams
Streams are collections of similar events. Streams belong to a data store, which is like a database. Advanced Billing creates a data store for you automatically when you enable Events-Based Billing. In some cases, you may wish to connect a separate data store that already contains your event data.
Create A Stream
Step 1: Navigate to the “Streams” menu item within the “Events” main-navigation and click “New Event Stream” (see Figure 1)
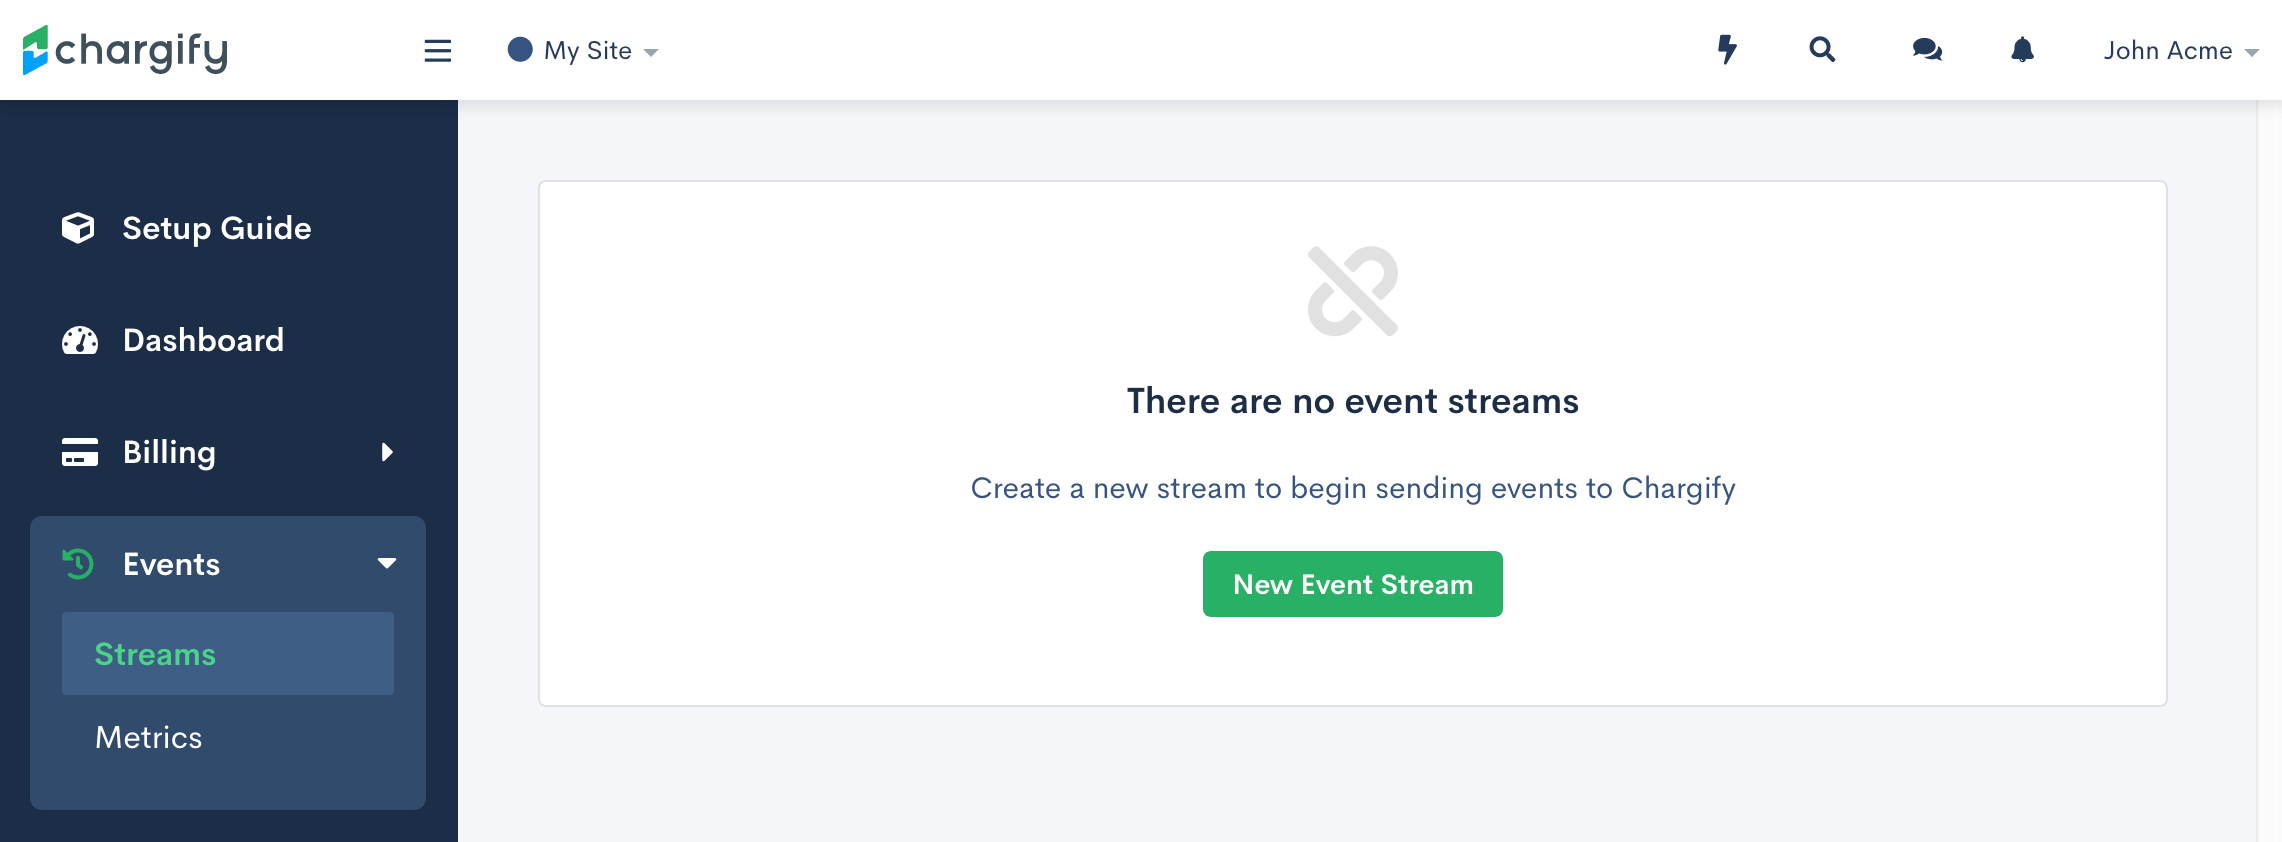
Figure 1: Navigate to "Streams" to create a stream
If the “Events” menu item is not visible, see Enabling Events-Based Billing in Settings.)
Step 2: Complete the form for the new event stream (see Figure 2)
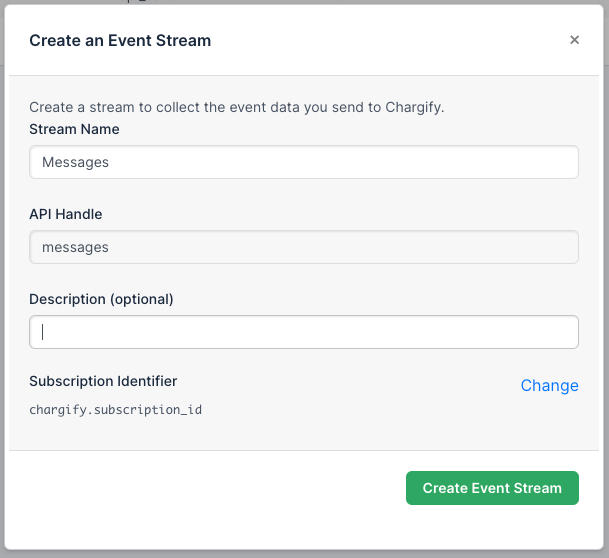
Figure 2: Fill out details for the new stream
Stream Attributes
- Stream Name: The human-readable name for the stream. e.g. “API Calls”. The stream name should be somewhat descriptive of the action that triggers the events which are sent to the stream, e.g. "clicks", "messages", "calls".
- API Handle: The URL-friendly “shortname” for the stream that will be used in the API endpoint for ingesting events. e.g. “api_calls”.
- Description: An optional description for the stream for your own reference.
- Subscription Identifier: This tags and attaches specific events to the appropriate subscription account that they should belong to and thus should be billed to. (See Correlating Events to Subscriptions, below)
Stream Schema
Once you have sent events to Advanced Billing, you can view the “schema” of those events. The schema lets you know the properties and inferred types of those properties found in the events you’ve sent. Your events need not all have the exact same schema; in fact, you can alter your schema at any time. The schema we show you can be considered a “superset” of the schema found in the events you’ve sent. It may show properties that you no longer use.
Note: the schema we display to you on the “Schema” tab may not reflect the latest events you’ve sent. The schema update may lag up to 10 minutes behind any schema changes you have made.
Sending Events to Advanced Billing via Airbyte.io
Using our integration with Airbyte, merchants can now easily connect their event data with Advanced Billing. Click here to learn more.
Sending Events to Advanced Billing via the API
In order to send your events to your streams, you must use the API. Once you create a stream, the stream page will provide you with the stream’s API URL and a guide for how to stream.
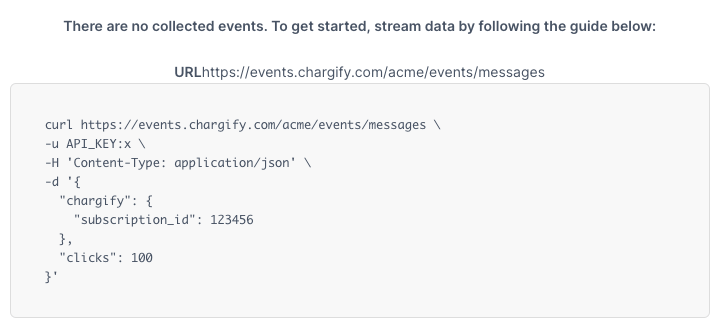
The stream API guide and URL
API Request URL
https://events.chargify.com/:site_subdomain/events/:stream_api_handleWith respect to the template above:
- The URL subdomain is
events, regardless of your site’s subdomain. Note that this differs from the main Advanced Billing API, where your site’s subdomain is used as the URL subdomain. - Your site’s subdomain is a part of the URL path, replacing the token
:site_subdomainabove - Lastly, the stream’s API handle is also a part of the URL path, replacing the token
:stream_api_handleabove
Authentication
Authentication is performed in the same way as the rest of the Advanced Billing API:
- Credentials should be sent using the HTTP Basic authentication schema
- The “username” is one of your site’s API Keys
- The “password” is unused, but should be set to the value “X”
The above can be accomplished via curl using the -u option: curl -u {API_KEY}:X.
Request Body
Your request body should be your event data encoded as a JSON object. See our Event Data Modeling Guide for more information.
Event Timestamps
Our API is designed so that you can stream your events to Advanced Billing in real-time. When events are billed, only those events that occurred between the start and end of the subscription period are considered. You may provide a timestamp for the event with the API request to explicitly mark when the event occurred. If you do not provide an explicit timestamp, we set the timestamp to the time which the event was received.
You may set the timestamp in your event data using the chargify.timestamp key. If given, the timestamp should be provided as a string in the ISO-8601 format ({YYYY}-{MM}-{DD}T{hh}:{mm}:{ss}.{SSS}{TZ}).
Example event body with timestamp specified:
{
  "endpoint": "logins",
  "duration": 100.4,
  "chargify": {
    "subscription_id": 5638767,
    "timestamp": "2019-12-30T13:47:29-05:00"
  }
}
Events with timestamps that pre-date the current subscription period are ignored for the purposes of billing. This means that you may stream events to Advanced Billing, for the purposes of providing historical data, without impacting your billing. In other words, old events cannot be back-billed. If an event was not present when a subscription is billed (e.g. because you haven’t yet sent it) or was outside of the period range for the subscription, it will be ignored for the purposes of billing.
About Timezones
Your timestamp may include a timezone, as defined by the TZ portion of the ISO-8601 format. We parse the timestamp and store events in a common timezone (UTC), so that we can retrieve events uniformly using the configured timezone of your site.
Correlating Events To Subscriptions
Unlike metered usage, events are not reported to subscription-specific endpoints. Therefore, in order to tie an event to a given subscription in Advanced Billing, the event data itself must identify the subscription. In order to bill subscriptions for events, the subscription identifier is necessary - at the end of a period, we bill for events by filtering events for the subscription and computing the event metric across the events for the subscription.
There are two ways you can identify the subscription within event data:
- By the subscription’s Advanced Billing ID, included in your event data in the
chargify.subscription_idproperty. - By the subscription’s reference field, included in your event data in the
chargify.subscription_referenceproperty, or a custom property of your choosing.
If you choose to identify the subscription by the reference field, you may either place that reference at the chargify.subscription_reference field, or at a place of your choosing by using a custom subscription identifier.
The subscription identifier is defined when creating or editing a stream, as shown below:

First, click the "Change" link
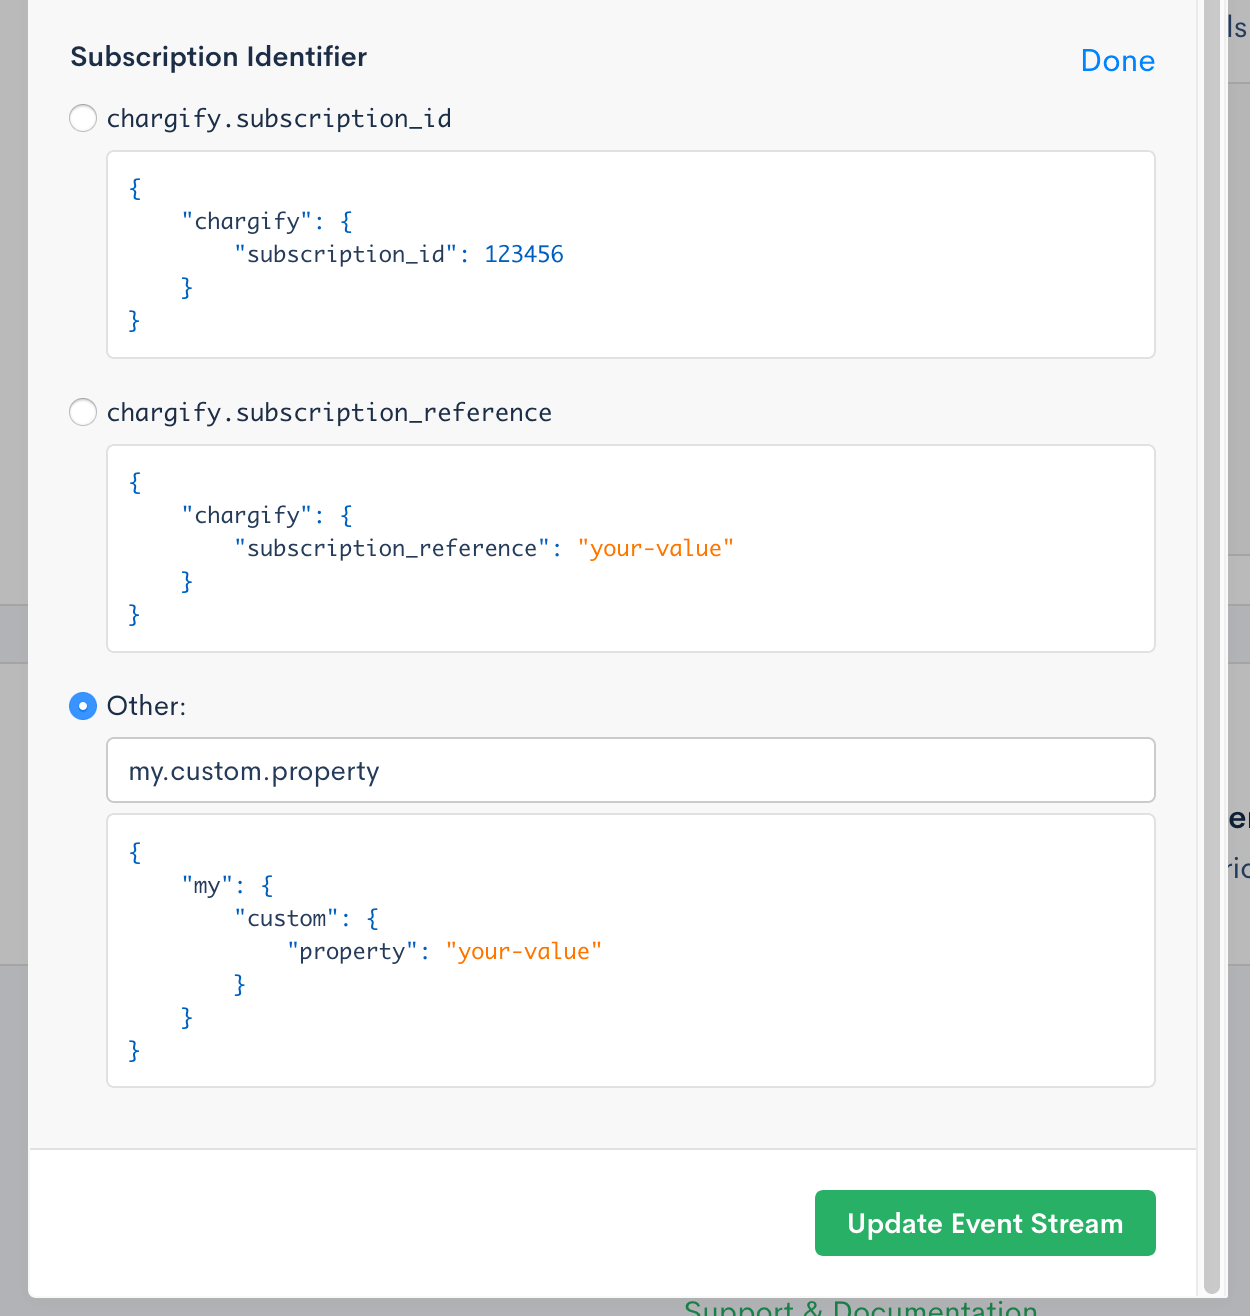
Then choose your identifier. Supply your custom property if necessary.
Metrics
Metrics are a computed value (e.g. count, sum, or average) over a stream of events to produce a numeric value of interest. Metrics have two main uses:
- Analytics and insights: You need not bill on your metrics. You can stream events and use the metrics dashboard to explore your data and perhaps uncover trends of interest.
- Billing for events: The guide for Billing on Events details how to set up the components and configure your billing on events.
Creating a Metric
Once you have streamed events, you may create a metric from a stream page or from the metrics page the latter URL would look something like this https://{SUBDOMAIN}chargify.com/event_based_billing/metrics.
Why must there be events before a metric can be created? Many metrics require the selection of a target property. We provide a list or properties from which to choose based on the schema of the events you have sent to a stream.
A metric can be created by clicking the “Create New Metric” button from either a stream page or the metrics page.
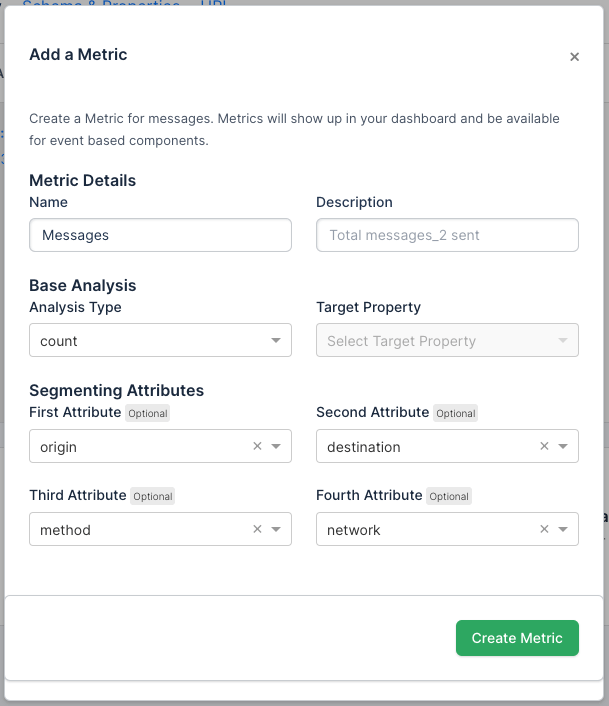
Create a Metric
Metric Attributes
- Name: A descriptive name for the metric, such as “Count of API Calls” or “Average API Call Duration”
- Description: An optional description for the metric
- Analysis Type: The type of numeric analysis to perform; see Analysis Types below
- Target Property: The property on which to perform the analysis. Required for all analysis types except “count”
Analysis Types
- Count: the total number of events found in the stream.
- Count Unique: the number of unique values for a given property.
- Sum: calculates the sum of all numeric values for a given property.
- Average: calculates the average of all numeric values for a given property.
- Maximum: the maximum of all numeric values for a given property.
- Minimum: the minimum of all numeric values for a given property.
- Median: calculates the median of all numeric values for a given property.
- Percentile: calculates a given percentile of all numeric values for a given property.
- Standard Deviation: calculates a standard deviation of all numeric values for a given property.
Segmented Metrics
Your metrics can optionally be broken down into segments based on data within your events. For example, if your events are messages and one of your data attributes is country_code, you could create a metric to view “messages per country”.
To create a segmented metric, simply choose a property within the “Segmenting Analysis” section of the metric form. You may choose up to two segmenting properties - a primary and a secondary. Your events will then be grouped first by your primary property and then your secondary property. For example, “messages by country and state”.
Segmented metrics form the basis of Multi-Attribute Rating, a billing feature that allows you to define rates for each of the combinations found in your segments.
Note: If the “Segmenting Analysis” controls do not appear for you, please contact your Customer Success Manager to have them enabled.
Filters and Metrics
Once you have both streamed events and created the metric you will be able to view these events by using the filters on near the top right corner of your screen.
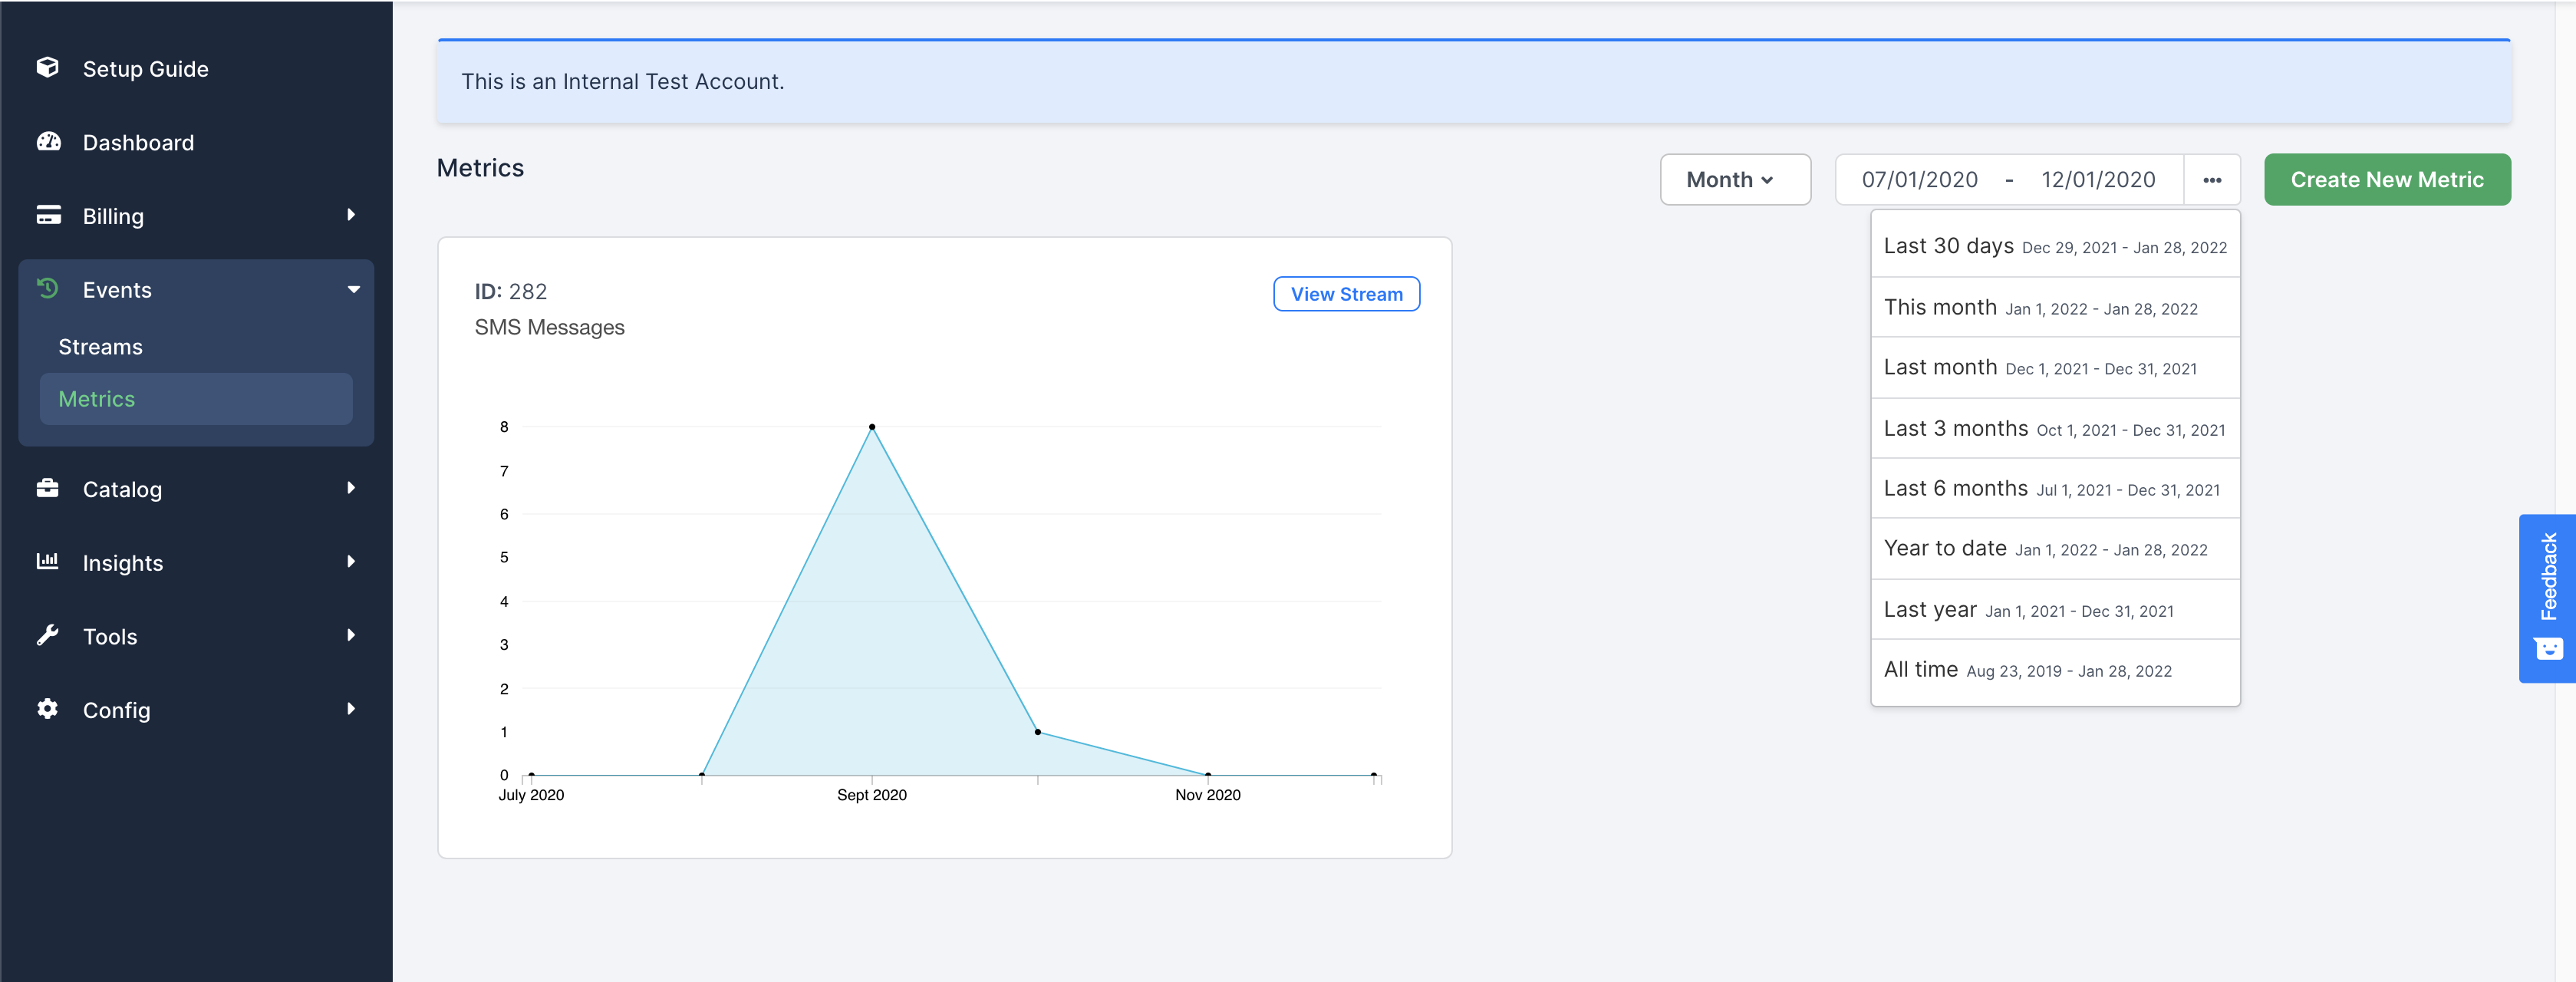
Filtering through Metric
Real-Time Events - Best Practices
Our API is designed so that you can stream your events to us as they happen. There are a few best practices you can follow to ensure optimal operation in the event of unforeseen problems:
- Send your events to Advanced Billing in a “background job”. We recommend that you do not block operation of your own service while waiting on a response from Maxio. Once the event happens in your system, enqueue a job to report that event to Advanced Billing in the background and keep going.
- Retry sending your events until they are accepted. If you do not receive a “201 Created” HTTP response and your request is otherwise well-formatted, there could be a problem in the network or at Advanced Billing. You should continue to retry sending your event while logging any issues on your end.
- Use the “chargify.timestamp” field to ensure the correct time is attributed with the event. Since there may be a delay between when the event occurs and when it is accepted by Advanced Billing, you may use the “timestamp” field to ensure the event is attributed at the correct time (and potentially within the correct billing cycle).
If you plan to send more than 200K events per day, please contact your Customer Success Manager to discuss pricing and implementation details.