Introduction
Our NetSuite integration will allow you to connect your Advanced Billing account directly to your NetSuite account to seamlessly sync your customers and the transactional data associated with them.
How it Works
Our Advanced Billing/NetSuite integration is a one-way integration with Advanced Billing being the source of truth. Because of this it is recommended, with the exception of marking sales orders as fulfilled, that NetSuite records created by the integration not be edited or deleted from within NetSuite.
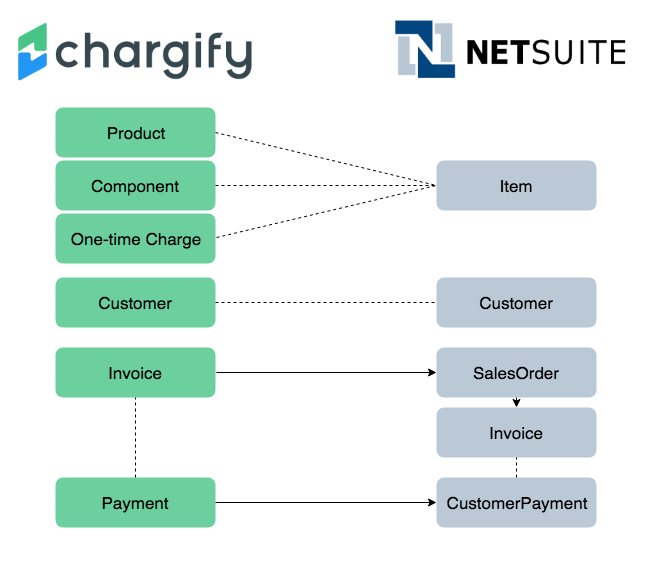
How records in Advanced Billing relate to records in NetSuite
We currently support two workflows for syncing invoices — one for invoices with inventory items and another for invoices with non-inventory items.
Inventory
When you create an invoice containing inventory items in Advanced Billing, a sales order will be created in NetSuite. Once you mark the sales order as fulfilled (shipped) in NetSuite, an invoice will be created and finally a customer payment when the invoice has been paid. If Advanced Billing collects a payment before the sales order is fulfilled, a customer deposit will be created instead.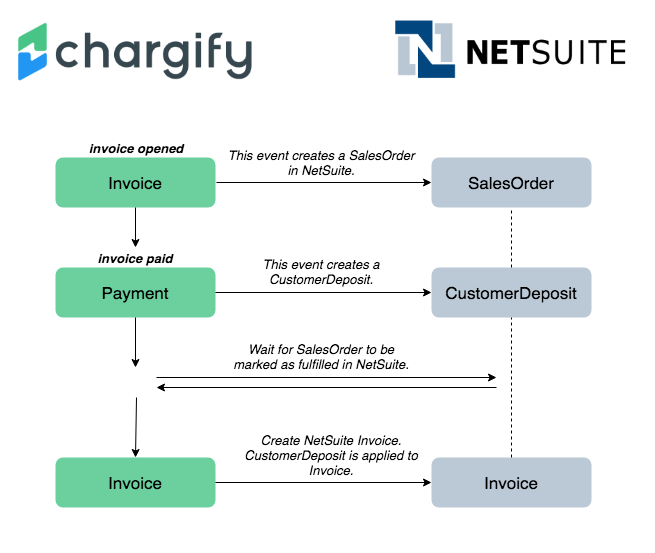
When you create an invoice containing no inventory items in Advanced Billing, a sales order is created in NetSuite which will create the associated invoice. When a payment is collected in Advanced Billing, we’ll create a customer payment applied to the invoice in NetSuite.
Non-inventory

Sync mapping for non-inventory
Taxes
Our integration represents tax amounts collected in Advanced Billing as an additional line item on invoices in NetSuite. In addition, Advanced Billing will include the tax amount charged per product/component on each associated line-item via a custom field. This is important to make note of this because you won’t see tax amounts in NetSuite’s designated invoice header-level tax field or line-item level tax fields.
During the integration setup, you’ll be asked to specify which NetSuite item you’d like Advanced Billing to use to represent tax on invoices. It is recommended that you create a non-inventory item in NetSuite for tax amounts specific to this integration. We will mention this again in the Integration Prerequisites section.

Tax line items
Discounts
During integration setup, Advanced Billing will create a discount item in NetSuite labeled “Advanced Billing Discount” which will be non-posting. This discount item will be used to discount individual lines. Each line will have a discount below it that will apply the appropriate discount to the line above. Please note that all discounts in Advanced Billing will be assigned to the "Advanced Billing Discount" item created in NetSuite. The ability to associate Advanced Billing discounts to different NetSuite Items is not available in the integration.

Discount line items
Payments
During integration setup, similar to discounts, Advanced Billing will create a custom payment method in NetSuite labeled “Advanced Billing Payment”. This payment method will be used when syncing Advanced Billing payments to NetSuite customer payment records.
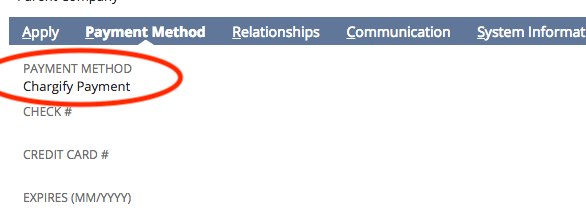
Payment methods
Custom Fields
We use custom fields in NetSuite to store Advanced Billing record metadata for reference purposes. Below is a list of custom fields created and populated by the integration.
| NetSuite Record | Name | Description |
| Customer | Advanced Billing Customer ID | Contains the customer’s Advanced Billing ID. |
| Customer | Advanced Billing Subdomain | Contains the Advanced Billing customer’s site subdomain. |
| Line Item | Advanced Billing Line Item Tax | Contains the line item’s tax amount charged in Advanced Billing. |
| Sales Order | Advanced Billing Subdomain | Contains the Advanced Billing site’s subdomain. |
| Sales Order | Advanced Billing Invoice Number | Contains the Advanced Billing invoice UID. |
Integration Prerequisites
There are a few checklist items that you’ll need to have completed before enabling our NetSuite integration.
-
Enable SuiteTalk Web Services
Navigate to Setup -> Company -> Enable Features -> SuiteCloud and check the SuiteTalk (Web Services) box.
-
Create an Item for Tax
Navigate to Lists -> Accounting -> Items -> New. As mentioned in the Taxes section, it’s advised to create an non-inventory item designated for representing tax amounts on sales order and invoices.
How to Enable the Integration
Navigate to the ‘Integrations’ tab in your Advanced Billing account and click the ‘NetSuite’ tab in the sidebar menu. Click ‘Enable NetSuite Integration’.
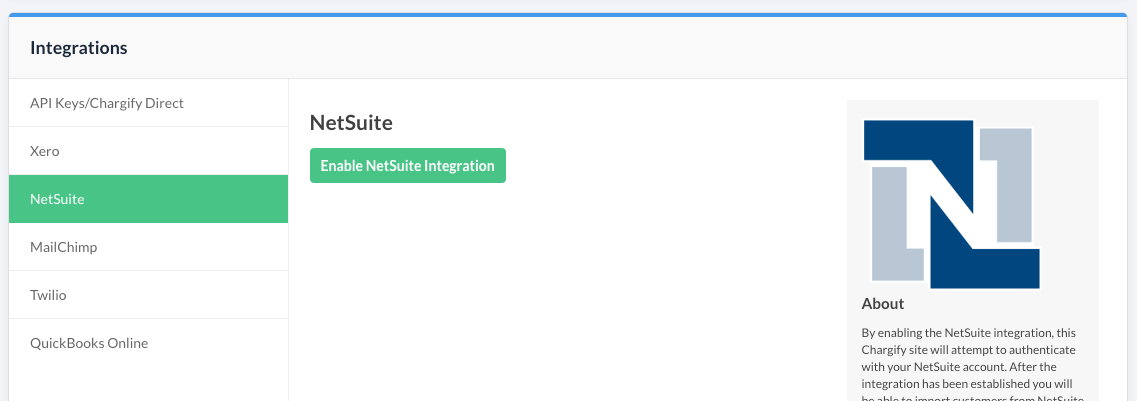
Enable the integration in Advanced Billing
Step 1 - Credentials
The first step of the NetSuite integration setup is to provide your NetSuite API credentials. This will allow Advanced Billing to communicate with your NetSuite account. The goal of this section will be to obtain the following five credentials:
- NetSuite Account ID
- Consumer Key
- Consumer Secret
- Token ID
- Token Secret
As a heads-up, this process is a bit lengthy. We recommend opening a notepad to copy and paste your keys as you obtain them. After the five credentials have been gathered, you can enter them in Advanced Billing.
Note: The following steps must be performed in NetSuite by a user with an administrator or “full access” role. To begin, log in to NetSuite.
Locate NetSuite Account Number
- Navigate to your Company Information page. From the navigation menu, select Setup -> Company -> Company Information.
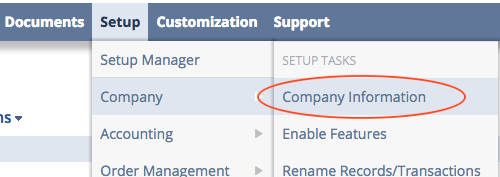
Location of NetSuite Company Information link
- Once on your company information page, you will see an ACCOUNT ID label, as shown below. This is your NetSuite account ID.
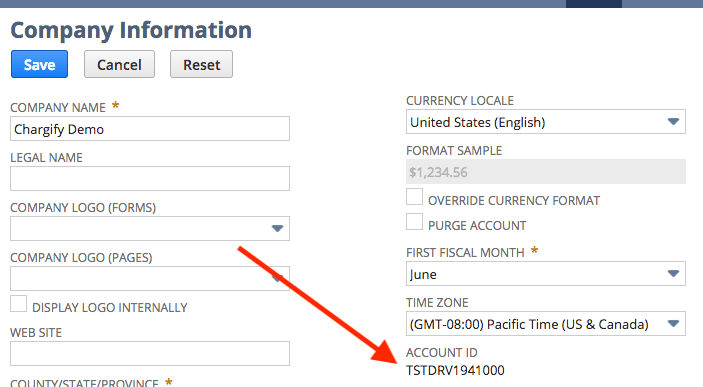
Location of NetSuite account ID
Create Integration Record
Next, we’ll create an integration record to identify the Advanced Billing application in NetSuite’s system.
Navigate to Setup -> Integration -> Manage Integrations -> New.
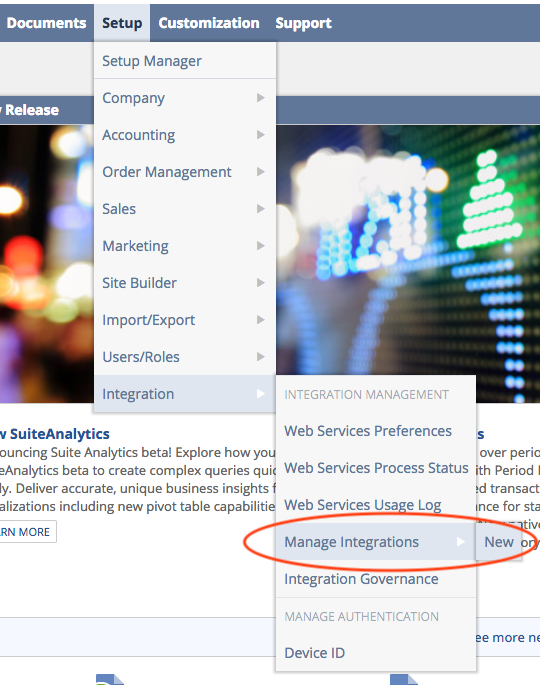
Location of NetSuite manage integrations link
On the New Integration form:
- Fill in the Name field with “Advanced Billing”
- Make sure “Enabled” is selected in the State dropdown menu
- Check the TOKEN-BASED AUTHENTICATION checkbox
- Click Save
After the integration record has been saved, NetSuite will display a CONSUMER KEY and CONSUMER SECRET, as shown below. Copy and paste your key and secret to a notepad as NetSuite will not display these values again.
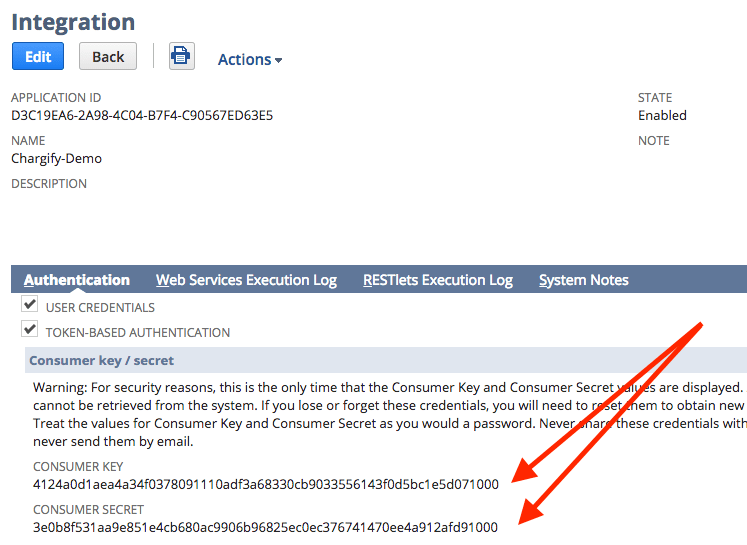
Copy and save your consumer key and secret key from NetSuite
Enable Token Based Authentication
- Navigate to Setup -> Company -> Enable Features -> SuiteCloud

NetSuite Enable Features menu

NetSuite SuiteCloud tab menu
- Under the Manage Authentication section, check the TOKEN-BASED AUTHENTICATION checkbox and click Save.
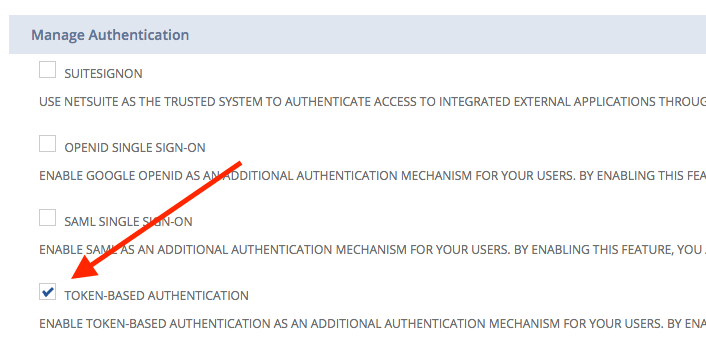
Enable TOKEN-BASED AUTHENTICATION
Create a Token Role
Next, we need to create a role. This role will hold the permissions required by Advanced Billing for the integration.
Navigate to Setup -> Users/Roles -> Manage Roles -> New.
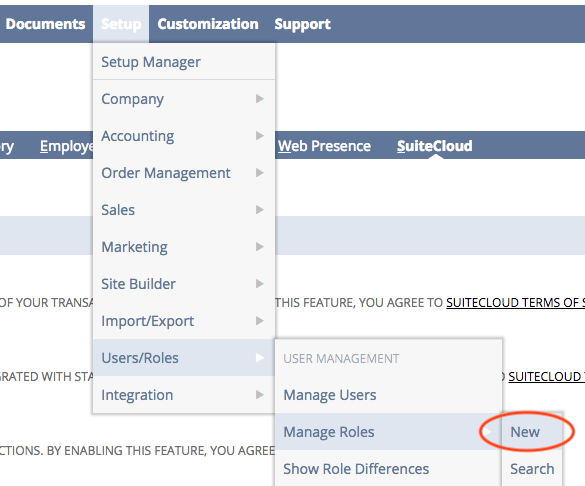
NetSuite Manage Roles link
Populate the Name field with “Advanced Billing Token Role”.
Then, under Permissions, add the following permissions for each section:
Transactions
| Permission | Level |
| Access Payment Audit Log | View |
| Item Fulfillment | View |
| Credit Memo | Full |
| Customer Deposit | Full |
| Customer Payment | Full |
| Customer Refund | Full |
| Find Transaction | Full |
| Fulfill Orders | Full |
| Invoice | Full |
| Invoice Approval | Full |
| Invoice Sales Order | Full |
| Sales Order | Full |
| Sales Order Approval | Full |
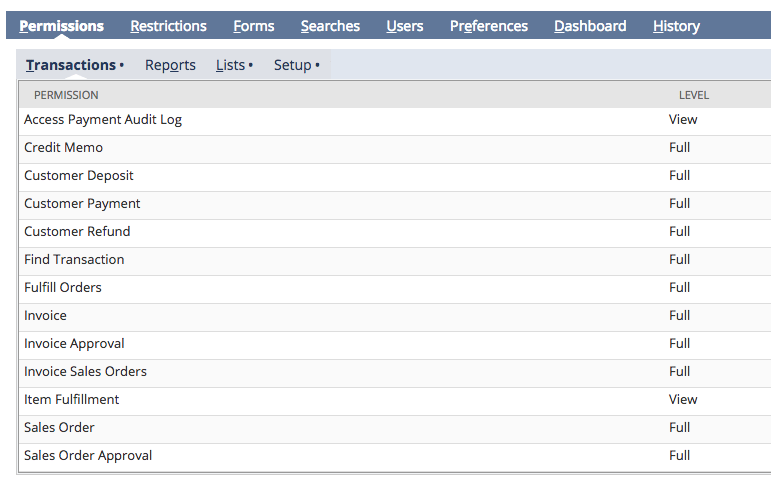
Role Transactions permissions in NetSuite
Lists
| Permission | Level |
| Accounts | View |
| Companies | View |
| Income Registers | View |
| Mass Updates | View |
| Tasks | View |
| Tax Records | View |
| Tax Schedules | View |
| Units | View |
| Currency | View |
| Subsidiaries | View |
| Departments | View |
| Customers | Full |
| Items | Full |
| Locations | Full |
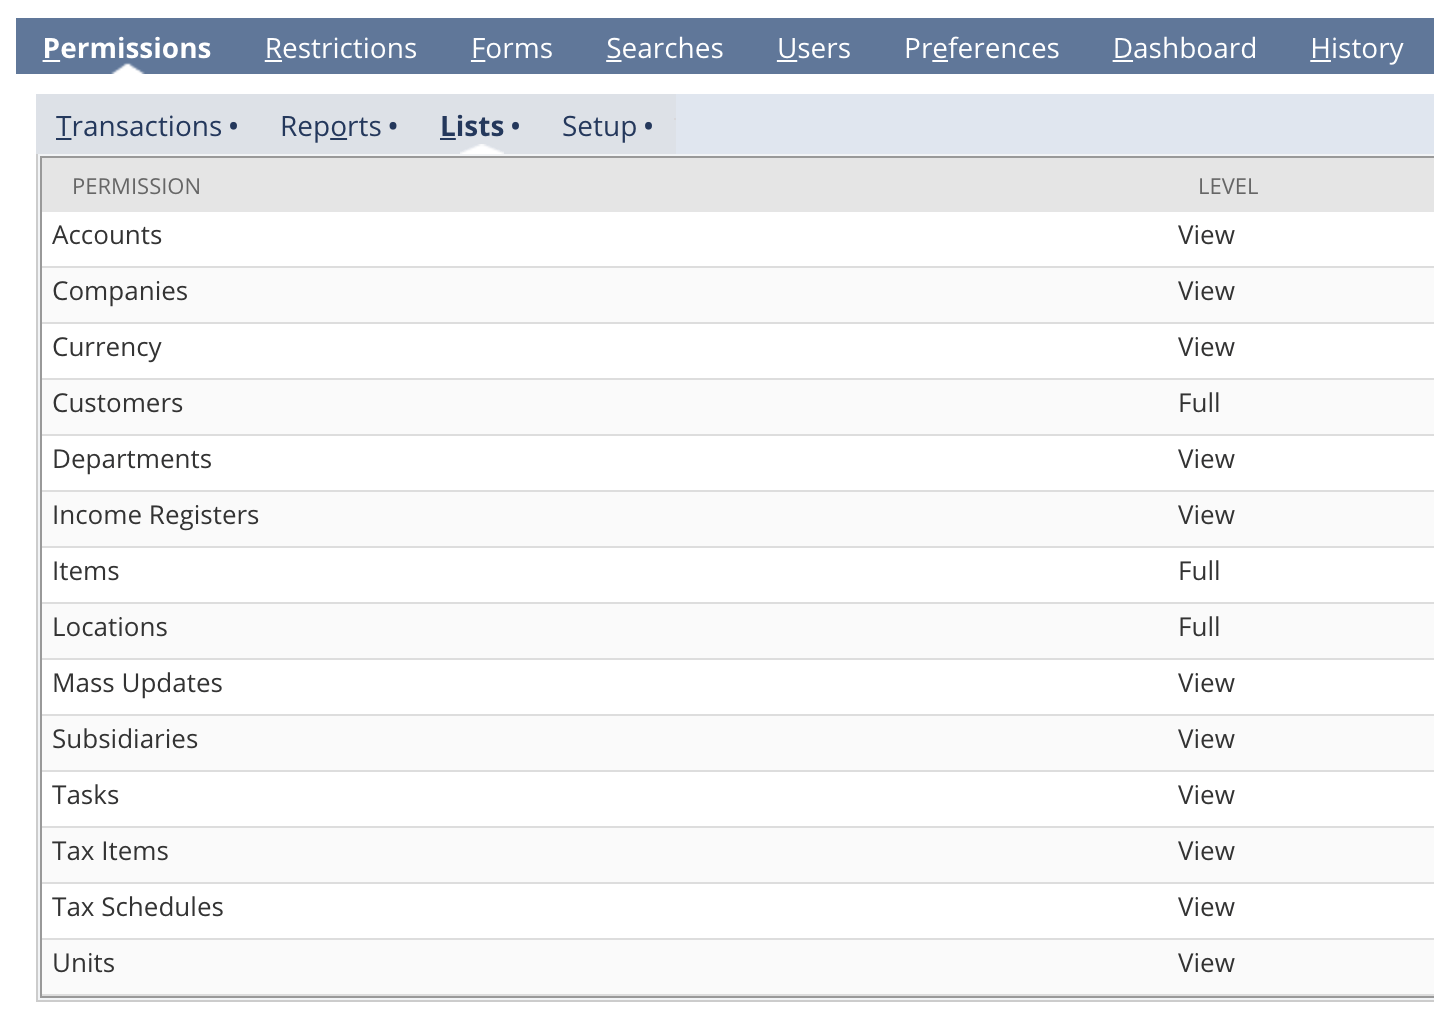
Role Lists permissions in NetSuite
Setup
| Permission | Level |
| Other Lists | View |
| Set Up Company | View |
| Access Token Management | Full |
| Accounting Lists | Full |
| Accounting Management | Full |
| Company Information | Full |
| Custom Body Fields | Full |
| Custom Column Fields | Full |
| Custom Entity Fields | Full |
| Custom Transaction Fields | Full |
| Log in using Access Tokens | Full |
| User Access Token | Full |
| Web Services | Full |
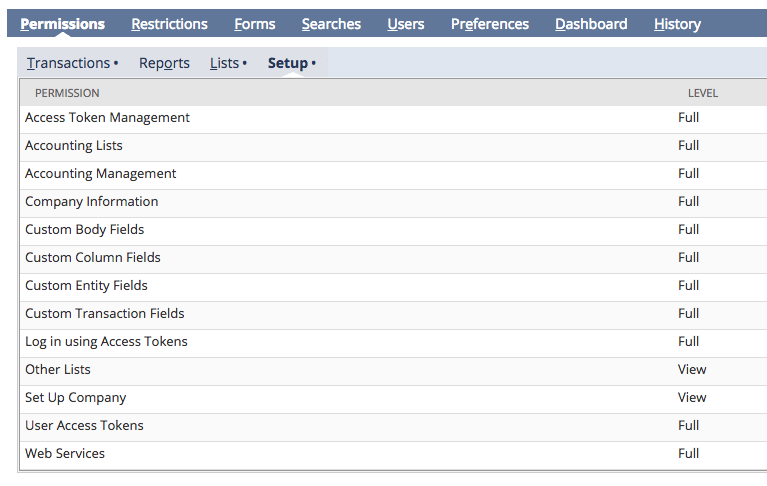
Role Setup permissions in NetSuite
If your configuration supports Subsidiaries, please select one to which this token belongs.
Also check ALLOW CROSS-SUBSIDIARY RECORD VIEWING.

NetSuite Manage Role - Subsidiary Settings
Assign Advanced Billing Token Role
- Navigate to Lists -> Employees -> Employees.
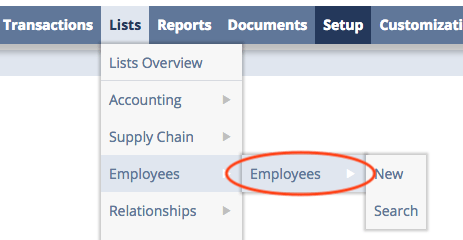
Employees link in NetSuite
-
Then, locate your employee record and click “Edit”.
-
Under the Access section, assign the role that you created in the previous step, as shown below. Save your changes.

Employee Access tab
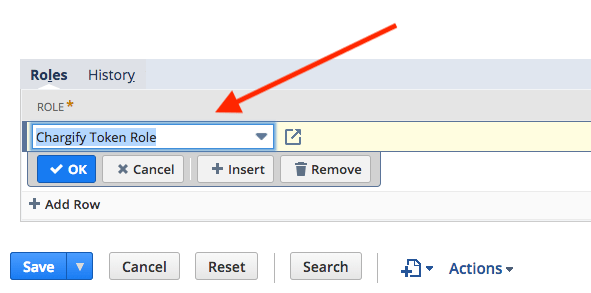
Assign Advanced Billing token role
Create your Access Token
- Navigate to Setup -> Users/Roles -> Access Tokens -> New.
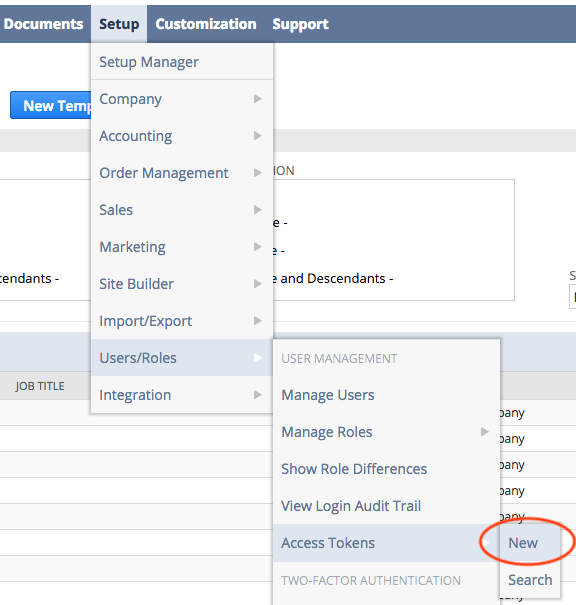
New Access Token link in NetSuite
- Select “Advanced Billing” in the APPLICATION NAME menu.
- In the USER menu, select the user that you modified in the previous step.
- Select “Advanced Billing Token Role” in the ROLE menu.
- Click Save
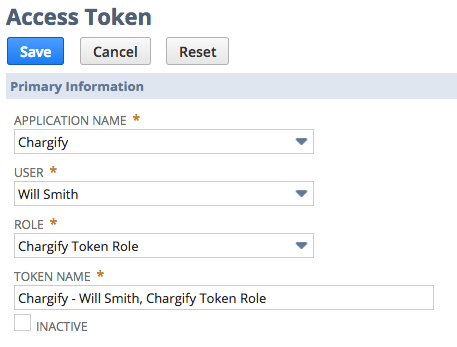
Access token
Once the Access Token has been saved, NetSuite will display a TOKEN ID and TOKEN SECRET, as shown below. Similar to the consumer key and secret, copy and paste these values to a notepad as NetSuite will only show them once.
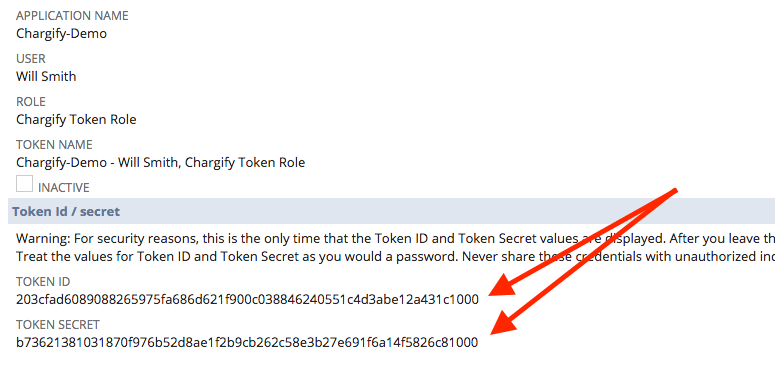
Copy and paste these values to a notepad as NetSuite will only show them once
Enter NetSuite API Credentials in Advanced Billing
You’ve made it to the final authorization step! Now, you’ll enter your NetSuite Account ID, Consumer token and secret, and your Token ID and secret in Advanced Billing. When the form is submitted, Advanced Billing will validate we can connect successfully to your NetSuite account.

Enter NetSuite API Credentials in Advanced Billing
Step 2 - Mapping Advanced Billing Products & NetSuite Items
On this step, you’ll specify which NetSuite Item should be used for taxes. Then, you’ll map your Advanced Billing product catalog to NetSuite Items.
Below is a list of supported NetSuite Item types:
- Inventory
- Non-inventory
- Service
- Assembly
- Kit
If you use an Item type not shown in this list, please let us know.
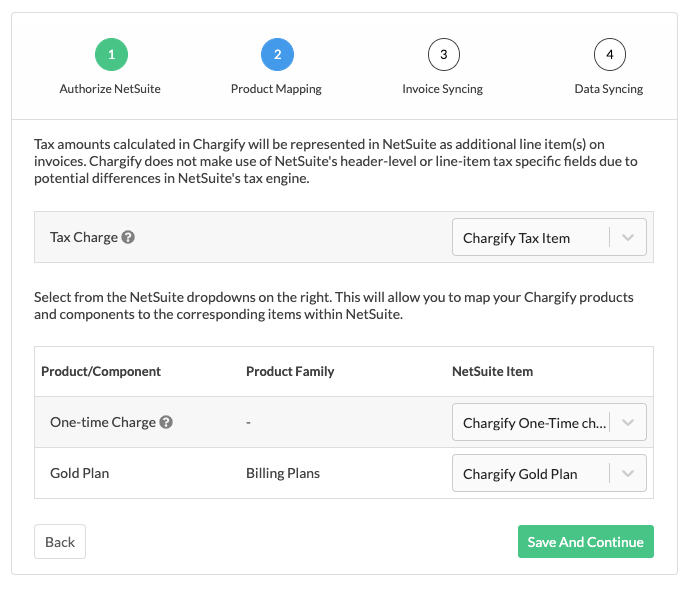
Advanced Billing Product Catalog Mapping
Step 3 - Invoice Sync Settings
This step allows you to configure invoice sync settings. This includes:
- A setting to control whether or not zero-dollar invoice should sync to NetSuite. The purpose of this setting is to support an option to ignore zero-dollar invoices for trials and free services. Note: when enabled, fully-discounted invoices will still sync to NetSuite.
- A setting to sync either consolidated (parent) or segment (child) invoices for subscription groups.
- Specifying custom Revenue Recognition fields. This setting allows you to better control how subscription revenue is handled by the Revenue Recognition report in NetSuite. If the “yes” option is chosen, dropdowns will appear to pick a start and end date field.
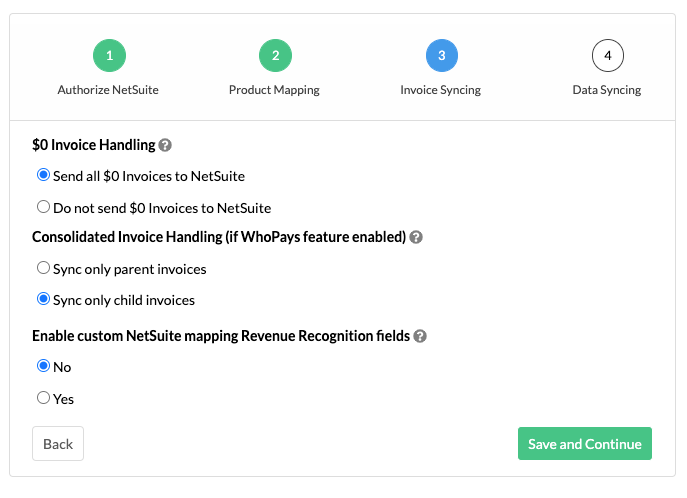
Configure invoice syncing
Step 4 - General Sync Settings
This last step allows you to configure several general sync settings.
Customer Sync
Customers in Advanced Billing can be matched to NetSuite Customers by either:
- Email Address
- NetSuite Customer External ID.
When matching customers during invoice sync, we use a find-or-create approach. For example, if the customer cannot first be found email address in NetSuite, we’ll create a NetSuite customer. For NetSuite customers created by the integration, we’ll store the customer’s Advanced Billing ID and site subdomain on the NetSuite record via custom fields. In addition, whether or not our Advanced Billing integration has created the customer, we will store the Advanced Billing Customer ID in the NetSuite Customer external ID field.
Note: The find-or-create process only applies for the first time that a Customer is synced to NetSuite. Once a NetSuite Customer mapping is established, our integration will rely on the established link between Advanced Billing ID and NetSuite internal ID for all future sync updates. This means Customer email addresses can change without causing duplicate records in NetSuite. Additionally, deleting or merging customers in NetSuite will impact the established mapping, which will require the mapping to be updated. In this case, please contact Maxio Support for assistance.
Payment Instruments
This setting requires you to indicate if the Payment Instruments feature is enabled in NetSuite. Payment Instruments deprecate the use of Payment Method in NetSuite so, when enabled, Advanced Billing will exclude payment method when creating Customer Payments, Customer Deposits, and Customer Refunds in NetSuite.
Refund Accounts
These settings allow you to specify an Account (required) and Accounts Receivable Account (optional) for Customer Refunds.
Sales Order Custom Form
Select the custom form that you would like the integration to use when creating Sales Orders in NetSuite. We recommend creating a custom form specifically for your integration to minimize future errors. One example would be adding new mandatory fields in the form that do not exist in Advanced Billing.
Sync Start Date
This setting also allows you to either sync all transactions starting as of integration setup or from a prior date you can define.
Department and Subsidiary
The final two options allow for customization of NetSuite sales orders and invoices by including a Department and/or Subsidiary. Choosing “Yes” for either option will populate dropdowns from your NetSuite account to select the value you wish to use.
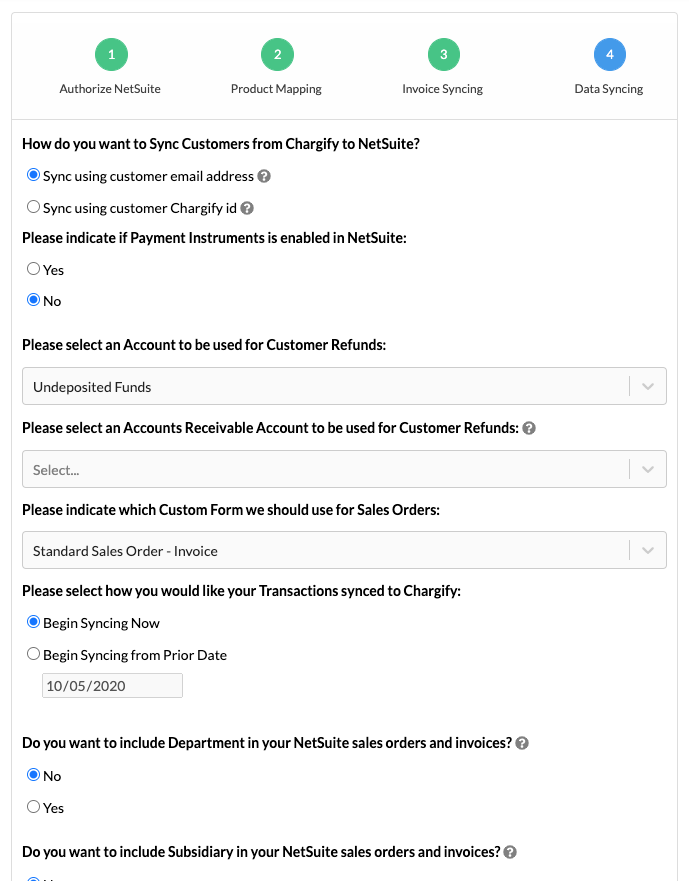
Sync settings in Advanced Billing
Error Handling
- Anytime an error occurs while the integration is enabled, Advanced Billing will display in-app notification. After issues have been addressed, you’ll be able to retry sync, at which point, failed sync tasks will be retried.
- Sync is performed for each Advanced Billing invoice independently, but in a predefined sync flow. If any of the steps fail, processing will end for the invoice. For example, if creating invoice in NetSuite fails, payment will not be applied until the problem is resolved.

In-app NetSuite integration error notification
Clicking View Error Logs or navigating to Config -> Integrations -> NetSuite -> View Error Logs will take you to the list of unresolved errors.
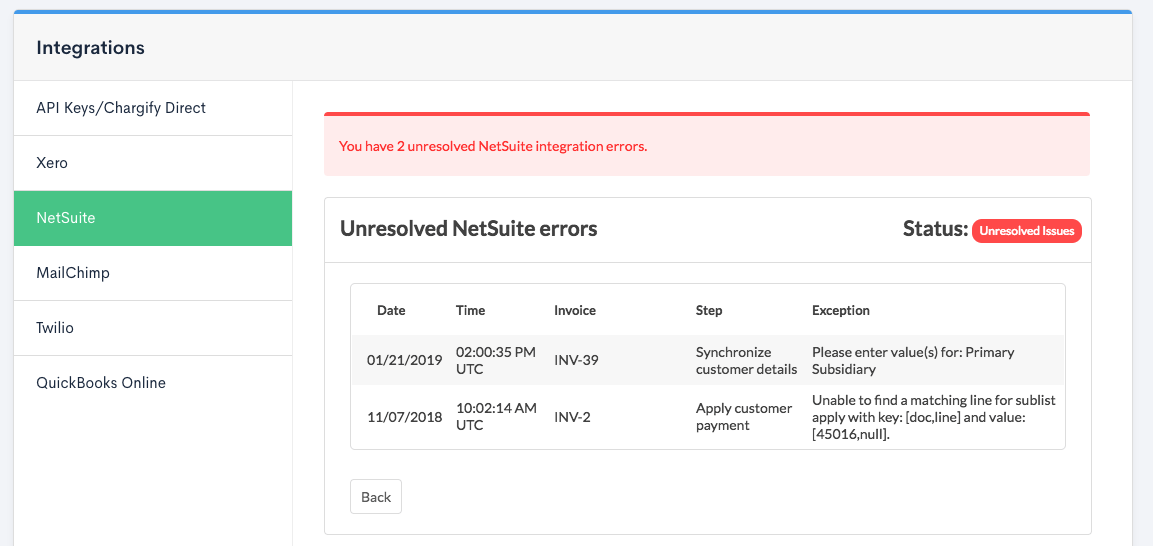
NetSuite integration error logs view
After resolving an issue you can manually trigger sync by clicking Sync Now. The integration is scheduled to sync every two hours but you are able to sync as needed using the Sync Now feature.
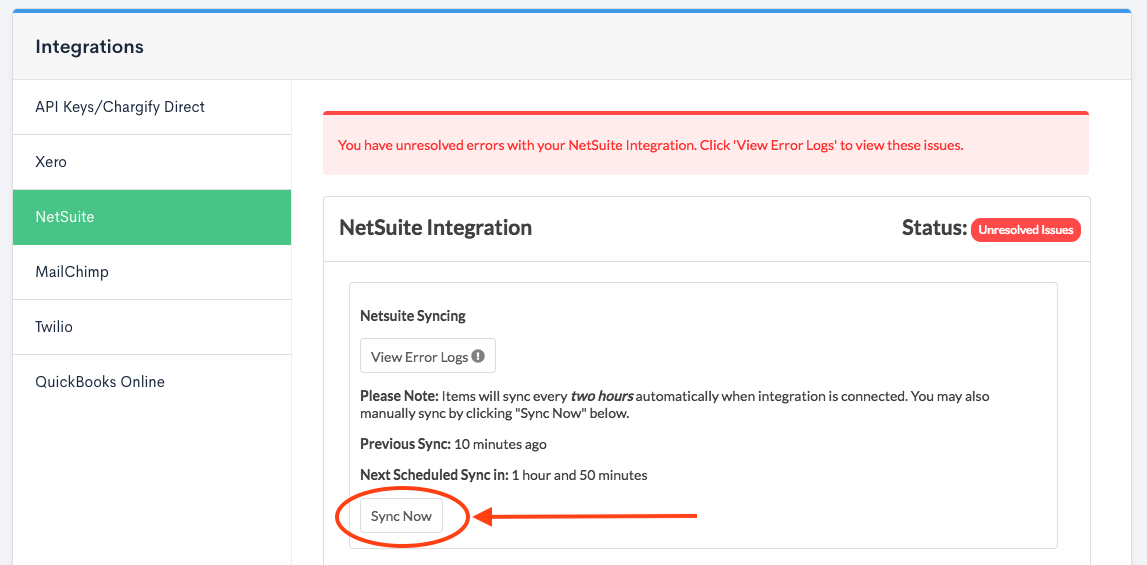
NetSuite integration error logs view
NetSuite Error Troubleshooting
Exception: Please enter value(s) for: Department
Cause: Your NetSuite configuration requires that department code needs to be sent while creating a transaction.
Solution: Navigate to Config -> Integrations -> NetSuite and enable
“Do you want to include Department in your NetSuite sales orders and invoices?”
Option in NetSuite integration and select desired Department.

NetSuite integration department code select
Exception: Insert Transaction failed: no valid open tax period for date x/xx/xxxx. Please visit Setup->Manage Tax Periods to setup a new tax period.
Cause: The Tax Period is a required when creating a transaction.
Solution:
Create Tax Periods that will correspond to the Transaction Date used on the Transaction.
Navigate in NetSuite to Setup -> Accounting -> Manage Tax Periods

Manage Accounting Periods in NetSuite
Exception: No sync flow defined for invoice ID: XX
Cause: We could not select a proper sync flow for the Advanced Billing Invoice
Solution: Please contact Maxio Support
Exception: Your search contains a reference to join for which you do not have a permission: XXX
Cause: Missing permissions
Solution: Please check permissions assigned to the token role
Exception: Invalid subsidiary reference key XXX
Cause: Subsidiary is inactive or token cannot access the Subsidiary
Solution:
Navigate to Setup -> Users/Roles -> Manage Roles
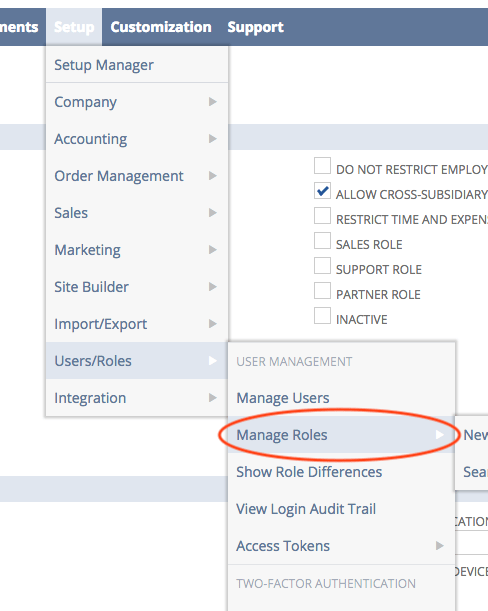
NetSuite Manage Roles
Select your Chargify Token Role. Make sure the role has access to the desired subsidiary and ALLOW CROSS-SUBSIDIARY RECORD VIEWING is checked.

NetSuite Manage Role - Subsidiary Settings
Exception: Invalid entity reference key XXX
Cause: Customer created by integration has been marked as inactive or can’t be accessed from current Subsidiary
Solution:
1) Set customer as active.
Navigate to Lists -> Relationships -> Customers -> Search
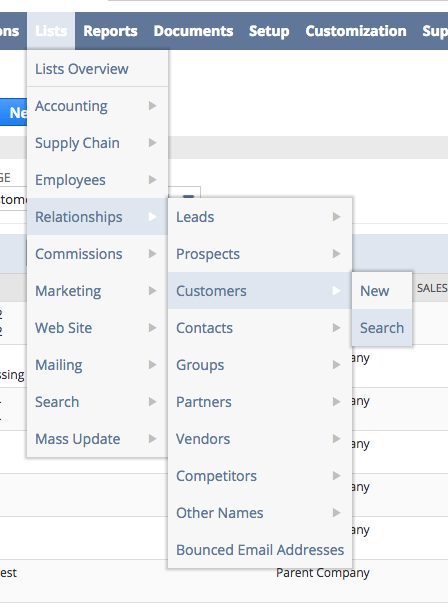
NetSuite Search Customer
Select Use Advanced Search
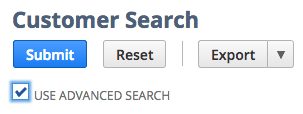
NetSuite Search Customer - Advanced Search
Under Standard tab, search for Internal ID (Number). A modal will appear once you select filter field.
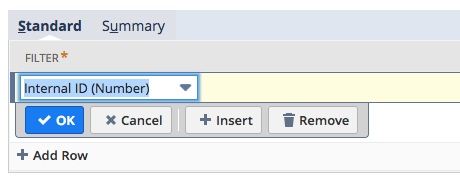
NetSuite Search Customer - Filter field
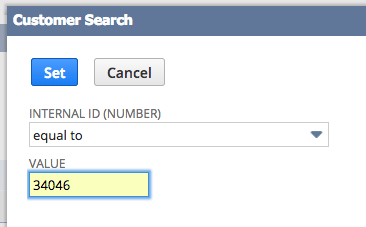
NetSuite Search Customer - Internal ID modal
Please enter reference key from the error message.
Submit the form. When NetSuite displays the customer, navigate to System Information tab and uncheck Inactive

NetSuite Search Customer - Enter reference key
Save the customer and try re-syncing.
2) Enable multi-subsidiary customers
If you have a multi-subsidiary NetSuite configuration, you may encounter an issue where the customer was already created but in different subsidiary. In this case, you’ll need to enable ‘multi-subsidiary customers’ feature in NetSuite configuration.
Navigate to Setup -> Company -> Enable Features
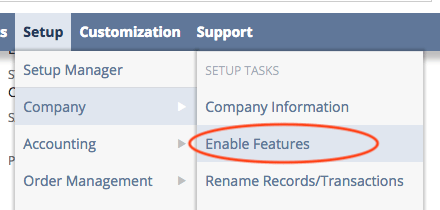
NetSuite Enable Features
Scroll down to ERP General section and check MULTI SUBSIDIARY CUSTOMER checkbox.
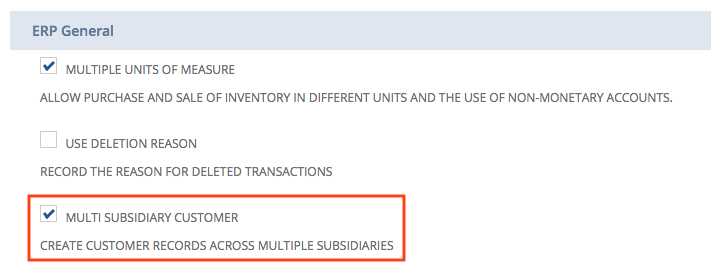
NetSuite Enable Features
Save and try re-syncing.